Setting up a CI/CD Pipeline for AWS Fargate using Github Actions - NodeJS version (Including creation of Infrastructure using AWS CDK)

In this guide, you're going to learn how to create infrastructure to host your dockerized application in AWS Fargate. Then, we're going to learn about how to setup CI/CD pipeline - so that when you push changes to your application - CI/CD pipeline will kick in, builds your image and push the image to ECR and then, your fargate tasks will be updated with latest image that has pushed to ECR.
Infrastructure for AWS Fargate:
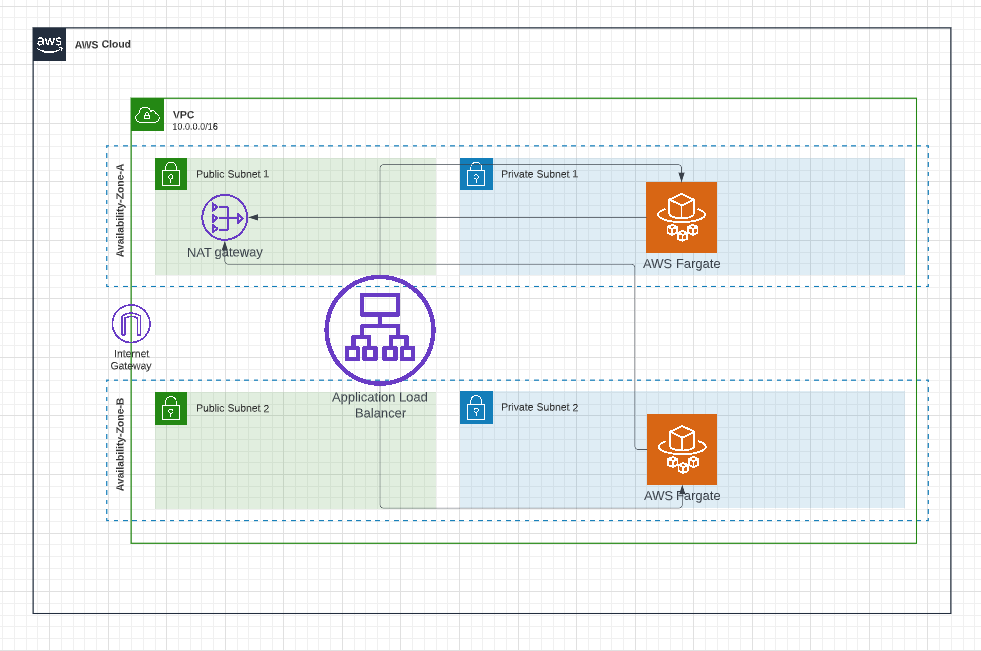
Below is the high-level architecture diagram for hosting our dockerized application in AWS Fargate.
VPC & Subnets:
It is always recommended to have separate VPC to host your application so that you can have logical separation between your application and your other AWS resources and this makes easier to manage. We're going to create a new VPC and we're going to use 2 availability zones to provide redundancy for your application. We're going to create 2 subnets (public subnet and private subnet) in each of these 2 availability zones. So, we're going to create 4 subnets across 2 availability zones.
Application load balancer & Fargate tasks:
We're going to host our fargate application in private subnets so that no one would be able to directly access our application. This provides additional security to our application. Then, we're going to create application load balancer and this application load balancer will reside in public subnets and the role of this application load balancer is to route requests from users to our fargate tasks in private subnets.
Nat Gateway:
As mentioned earlier, our fargate app is hosted in private subnets. Private subnets are subnets without any internet connectivity and this poses a problem. When you don't have internet connectivity, how we're going to pull the docker image and additional packages that are required for our application. NAT Gateway solves this problem. From our private subnet, using NAT gateway, you can access internet to from private subnet for outbound traffic and still all inbound traffic will be blocked.
Let us create this architecture using AWS CDK - an Infrastructure as Code (IaC) tool - developed and maintained by AWS. If you're new to AWS CDK - I strongly suggest you to read this guide to understand AWS CDK. No problem, I can wait.
You can execute below command to create AWS CDK app
mkdir aws-cdk-fargate
cd aws-cdk-fargate
cdk init app --language=typescript
CDK app would have created a stack file in lib folder.
VPC creation:
Now, we're going to create a VPC resource in this stack.
const vpc = new ec2.Vpc(this, "FargateNodeJsVpc", {
      maxAzs: 2,
      natGateways: 1,
      subnetConfiguration: [
        {
          cidrMask: 24,
          name: "ingress",
          subnetType: ec2.SubnetType.PUBLIC,
        },
        {
          cidrMask: 24,
          name: "application",
          subnetType: ec2.SubnetType.PRIVATE_WITH_NAT,
        },
      ],
    });
Above construct will create VPC with 2 availability zones and one NAT Gateway . In subnet configuration, we're asking CDK to create two types of subnets - public and private. Please note that this will automatically create Internet Gateway as the public subnet requires it. The private subnet will be attached to NAT Gateway as we've mentioned the subnet type as PRIVATE_WITH_NAT
This construct will create 4 subnets - 2 subnets in each of the availability zones and updates the route table to route traffic accordingly.
Application load balancer creation:
We can create Application Load Balancer using below construct. The application load balancer is to be associated with public subnets.
const loadbalancer = new ApplicationLoadBalancer(this, "lb", {
      vpc,
      internetFacing: true,
      vpcSubnets: vpc.selectSubnets({
        subnetType: ec2.SubnetType.PUBLIC,
      }),
    });
Cluster creation:
You can use below construct code to create Fargate cluster. We're associating this cluster to the VPC that we've created earlier.
const cluster = new ecs.Cluster(this, "Cluster", {
      vpc,
      clusterName: "fargate-node-cluster",
    });
Execution role:
The ECS agent should be able to pull images from ECR to update your tasks. This permission is represented by execution role . We're going to create this execution role with predefined managed policy AmazonECSTaskExecutionRolePolicy which would be used by fargate to pull the image or to log to cloudwatch.
const executionRole = new iam.Role(this, "ExecutionRole", {
      assumedBy: new iam.ServicePrincipal("ecs-tasks.amazonaws.com"),
      managedPolicies: [
        ManagedPolicy.fromAwsManagedPolicyName(
          "service-role/AmazonECSTaskExecutionRolePolicy"
        ),
      ],
    });
Creating ECR Repository:
You need to create ECR repository to store images. A ECR repository is created using below construct.
 const repo = new ecr.Repository(this, "Repo", {
      repositoryName: "fargate-nodejs-app",
    });
Please note that this ECR repository would be used in our CI/CD pipeline to push our images
Creating Fargate service:
We're going to use ecs_patterns.ApplicationLoadBalancedFargateService construct to create Fargate service - as shown below
 new ecs_patterns.ApplicationLoadBalancedFargateService(
      this,
      "FargateNodeService",
      {
        cluster,
        taskImageOptions: {
          image: ecs.ContainerImage.fromRegistry("amazon/amazon-ecs-sample"),
          containerName: "nodejs-app-container",
          family: "fargate-node-task-defn",
          containerPort: 80,
          executionRole,
        },
        cpu: 256,
        memoryLimitMiB: 512,
        desiredCount: 2,
        serviceName: "fargate-node-service",
        taskSubnets: vpc.selectSubnets({
          subnetType: ec2.SubnetType.PRIVATE_WITH_NAT,
        }),
        loadBalancer: loadbalancer,
      }
    );
cluster: This property tells AWS to use the specified cluster in which fargate service has to be created
taskImageOptions : The properties specified here would be used to create task definition for your fargate tasks.
image: This is the image that would be used to create container in fargate. Please note that we're not using our application image. Instead, we're using amazon/amazon-ecs-sample provided by AWS - This is a simple dockerized PHP application. To create and run fargate service, we need an image. Later, in CI/CD pipeline, we'll be overwriting this image with our custom application image.
family : This property represents name of the task definition. Any further updates to the task definition will increment the revision number associated with the task definition with the same family value. This family property would be used in our CI/CD pipeline to update the image.
containerPort : This is the port exposed by container. As we're going to build a simple web application with HTTP, we're using port 80.
executionRole: This is the role required by ECS agent which is used for pulling images from ECR and to log to cloudwatch
cpu: This value represents how much CPU you need for the task. As I'm going to create simple API with couple of endpoints, I've used the value 256 which represents .25 vCPU. You can increase the value as per your computational needs.
memoryLimitMib: This value represents how much memory you need for task. I've used 512.
desiredCount: This is the property which dictates how many tasks that you want to run as part of this service. I want to create 2 tasks just to have redundancy - each task would be created in private subnet of each availability zone. If you're expecting huge usage for your application, you may have to increase this value.
taskSubnets : This property tell AWS ECS fargate to launch in which subnets. For security reasons, we're going to use private subnets of our VPC created earlier.
loadBalancer : Represents the load balancer that would be used in our service.
Here is the complete CDK code for creating fargate service with application load balancer
export class AwsCdkFargateStack extends Stack {
  constructor(scope: Construct, id: string, props?: StackProps) {
    super(scope, id, props);

    const vpc = new ec2.Vpc(this, "FargateNodeJsVpc", {
      maxAzs: 2,
      natGateways: 1,
      subnetConfiguration: [
        {
          cidrMask: 24,
          name: "ingress",
          subnetType: ec2.SubnetType.PUBLIC,
        },
        {
          cidrMask: 24,
          name: "application",
          subnetType: ec2.SubnetType.PRIVATE_WITH_NAT,
        },
      ],
    });

    const loadbalancer = new ApplicationLoadBalancer(this, "lb", {
      vpc,
      internetFacing: true,
      vpcSubnets: vpc.selectSubnets({
        subnetType: ec2.SubnetType.PUBLIC,
      }),
    });

    const cluster = new ecs.Cluster(this, "Cluster", {
      vpc,
      clusterName: "fargate-node-cluster",
    });

    const repo = new ecr.Repository(this, "Repo", {
      repositoryName: "fargate-nodejs-app",
    });

    const executionRole = new iam.Role(this, "ExecutionRole", {
      assumedBy: new iam.ServicePrincipal("ecs-tasks.amazonaws.com"),
      managedPolicies: [
        ManagedPolicy.fromAwsManagedPolicyName(
          "service-role/AmazonECSTaskExecutionRolePolicy"
        ),
      ],
    });

    new ecs_patterns.ApplicationLoadBalancedFargateService(
      this,
      "FargateNodeService",
      {
        cluster,
        taskImageOptions: {
          image: ecs.ContainerImage.fromRegistry("amazon/amazon-ecs-sample"),
          containerName: "nodejs-app-container",
          family: "fargate-node-task-defn",
          containerPort: 80,
          executionRole,
        },
        cpu: 256,
        memoryLimitMiB: 512,
        desiredCount: 2,
        serviceName: "fargate-node-service",
        taskSubnets: vpc.selectSubnets({
          subnetType: ec2.SubnetType.PRIVATE_WITH_NAT,
        }),
        loadBalancer: loadbalancer,
      }
    );
  }
}
When you run cdk deploy to deploy the stack, all AWS resources would be created and the URL for application load balancer would be printed in the console. When you access the URL, you'll be able to see following page
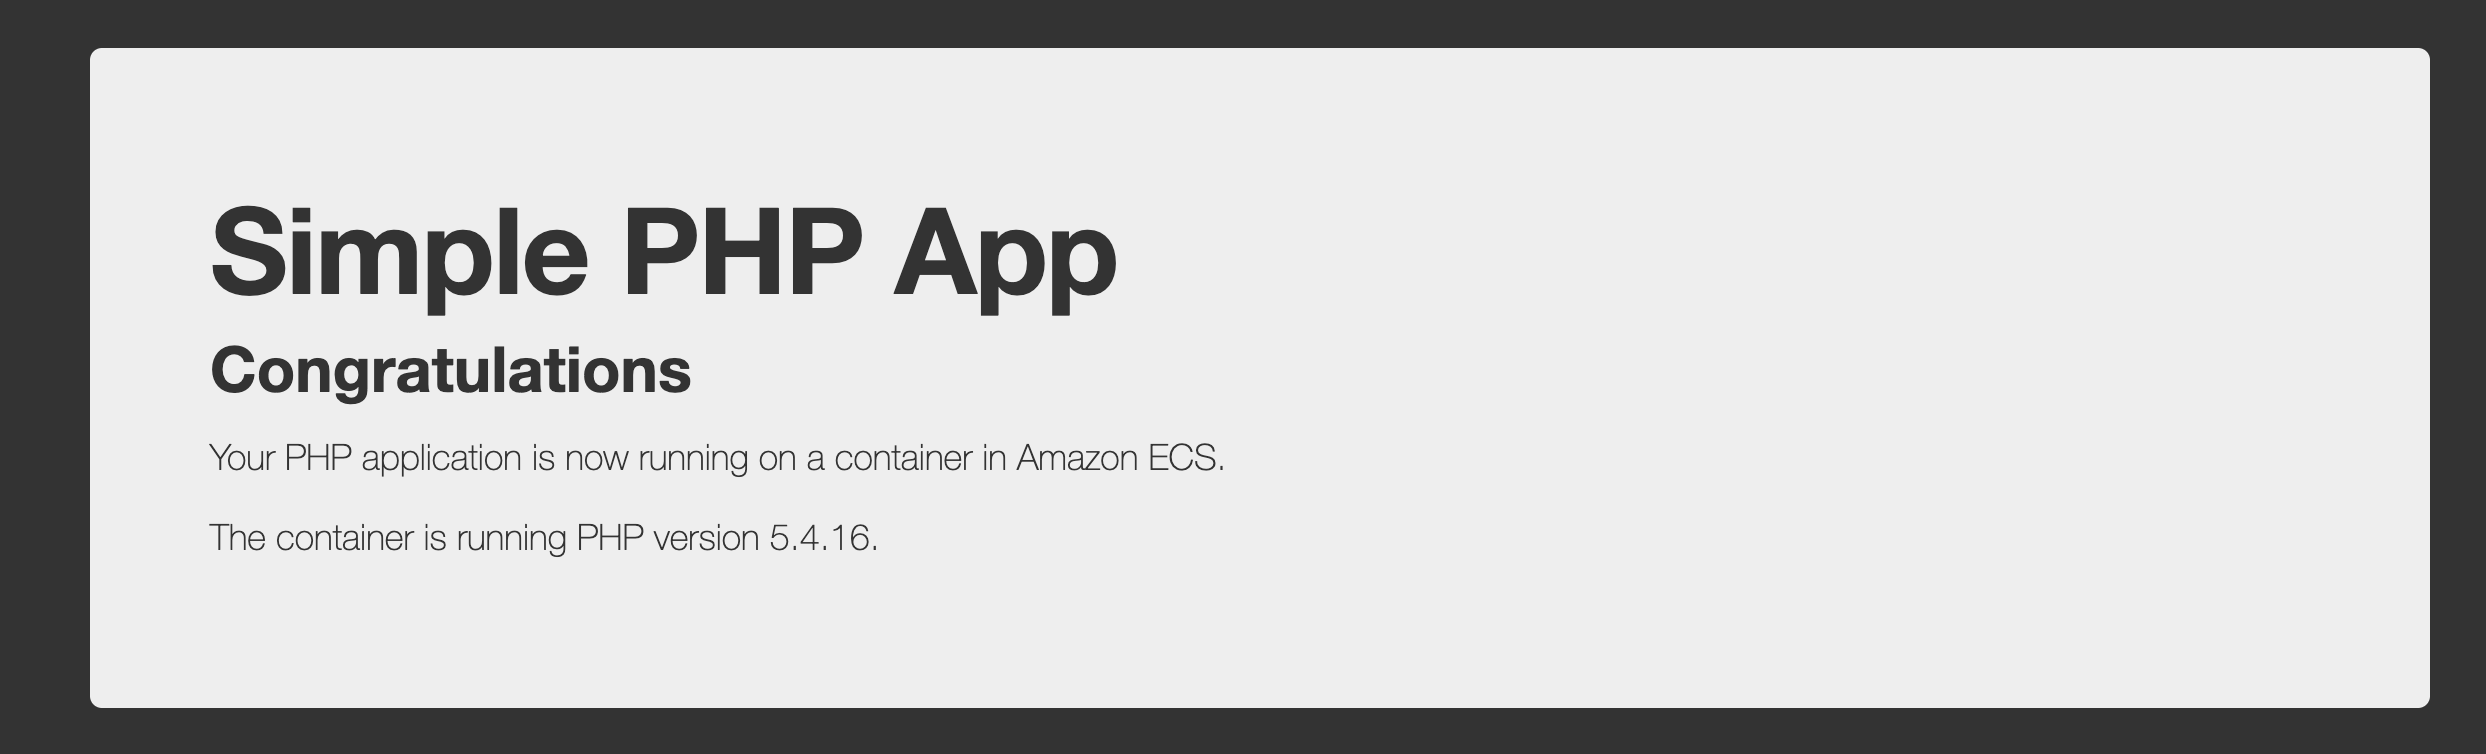
Please note that this is just a sample app. In the next step, we're going to deploy our nodejs app.
CI/CD Pipeline:
Before creating CI/CD pipeline, we're going to create a simple NodeJS app using express.
Simple NodeJS API
const express = require('express');

const app = express();
const PORT = process.env.PORT || 80;

const products = [
    {id: 1, name: "Product 1", price: 100},
    {id: 2, name: "Product 2", price: 200},
    {id: 3, name: "Product 3", price: 300},
];

app.get("/health", (req,res ) => {
    res.status(200).send({data: "OK"});
});

app.get("/", (req,res ) => {
    res.status(200).send({data: products});
});

app.listen( PORT, () => {
    console.log(`Listening at port:${PORT}`)
});
As the objective of this guide is to deploy our nodejs application into ECS service with launch type as fargate - I've made this application to be pretty simple. It just has couple of endpoints - / endpoint to return list of products and /health endpoint to return health status of this API.
AWS ECS service requires an image - so we need to create Dockerfile for creating an image out of this nodejs application.
Dockerfile for NodeJS API:
FROM node:16-alpine

WORKDIR /usr/src/app

COPY package*.json ./
RUN npm install
COPY . .

EXPOSE 80
CMD [ "node", "app.js" ]
I've made this Dockerfile simple as our focus is on building CI/CD pipeline for our ECS service.
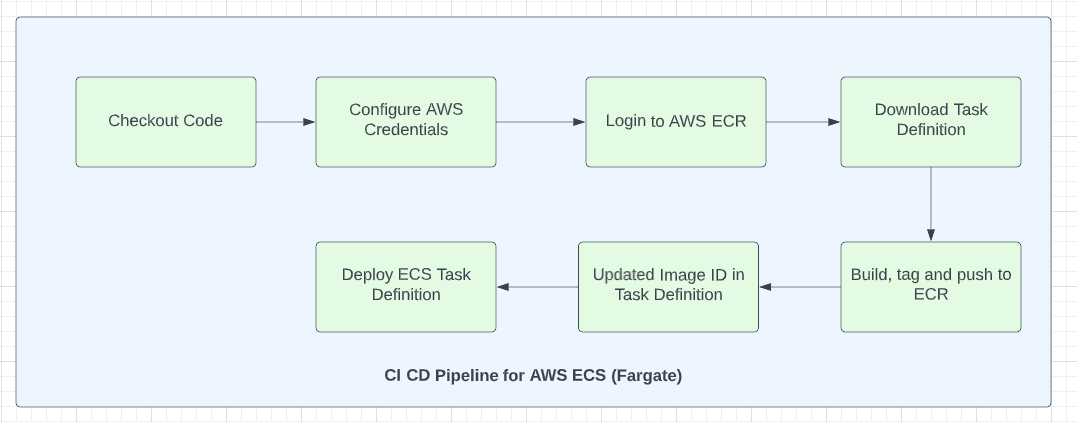
Below are the high level steps that we need to follow in our CI/CD pipeline using Github Actions to deploy dockerized nodejs application into AWS ECS service(with Fargate as launch type)
Steps in CI/CD pipeline for AWS Fargate:
If you're new to Github Actions, I strongly recommend you to read this guide on Github Actions. I'll wait. Please read that guide first :-)
Checkout Code : This is our first step in our CI/CD pipeline. As Github Actions does not checkout your code by default, we need to checkout the code. I'm using actions/checkout@v3 to checkout the code
- name: checkout code
uses: actions/checkout@v3Configure AWS Credentials: We're going to use Github OIDC to get the token from AWS as storing access keys and secret keys for long term in Github secrets is not recommended. Please follow the steps in this article to configure Github OIDC in AWS.
 - name: Configure AWS Credentials
   uses: aws-actions/configure-aws-credentials@v1
   with:
     role-to-assume: arn:aws:iam::<your-aws-account-number>:role/github-actions
aws-region: us-east-1Any steps after this configuration step will use the token generated from previous step.
Login to AWS ECR: Before pushing the image to ECR, we need to login to ECR
   - name: Login to AWS ECR
     id: login-ecr
uses: aws-actions/amazon-ecr-login@v1Download Task Definition : We need to download the task definition of AWS ECS service that we've created earlier. Please note that we need to specify the family of task-definition ( fargate-node-task-defn in our case). We've specified this value when creating infrastructure using CDK.
- name: Download task definition
  run: |
       aws ecs describe-task-definition --task-definition fargate-node-task-defn --query taskDefinition > task-definition.json
Build & push image to ECR: We need to build image using the Dockerfile created earlier, tag and push them to ECR. We're creating the 3 environment variables for this step
ECR_REGISTRY: Represents the ECR registry. Please note that you can whatever registry you want. For example, you could've used DockerHub. But, we're using AWS ECR as all of other infrastructure are in AWS ecosystem.
ECR_REPOSITORY: Name of the repository to which the image has to e pushed. We've hardcoded the name nodejs-app - as this is the name of the repo that we've created earlier in infrastructure setup.
IMAGE_TAG: I've hardcoded latest as the image tag. This is not ideal - as you want to tag the images according to the comments. You can the use commit SHA id for the image tag
  - name: Build, tag, and push image to Amazon
    id: build-image
    env:
      ECR_REGISTRY: ${{ steps.login-ecr.outputs.registry }}
      ECR_REPOSITORY: nodejs-app
      IMAGE_TAG: latest
    run: |
      docker build -t $ECR_REGISTRY/$ECR_REPOSITORY:$IMAGE_TAG .
      docker push $ECR_REGISTRY/$ECR_REPOSITORY:$IMAGE_TAG
      echo "::set-output name=image::$ECR_REGISTRY/$ECR_REPOSITORY:$IMAGE_TAG"
Then, I'm building the image in first command and pushing the image to AWS ECR repository.
Update Task Definition: Once the image is pushed to ECR, we're going to update the task definition with the id of that image that has just been pushed to ECR. We're getting the image id from the output of the previous step.
- name: Fill in the new image ID in the AWS ECS task definition
  id: task-def
  uses: aws-actions/amazon-ecs-render-task-definition@v1
  with:
    task-definition: task-definition.json
    container-name: nodejs-app-container
    image: ${{ steps.build-image.outputs.image }}
Deploy Task Definition: Finally, we need to deploy this task definition so that ECS service will use this updated task definition file to create ECS tasks. Existing task will be shut down.
- name: Deploy AWS ECS task definition
        uses: aws-actions/amazon-ecs-deploy-task-definition@v1
        with:
          task-definition: ${{ steps.task-def.outputs.task-definition }}
          service: fargate-node-service
          cluster: fargate-node-cluster
Complete Github workflow file code
name: build & deploy nodejs app to fargate

on: [push]

jobs:
  deploy-nodejs-app-fargate:
    runs-on: ubuntu-latest
    permissions:
      id-token: write
      contents: read
    steps:
      - name: checkout code
        uses: actions/checkout@v3
      - name: Configure AWS Credentials
        uses: aws-actions/configure-aws-credentials@v1
        with:
          role-to-assume: arn:aws:iam::853185881679:role/github-actions
          aws-region: us-east-1
      - name: Login to AWS ECR
        id: login-ecr
        uses: aws-actions/amazon-ecr-login@v1
      - name: Download task definition
        run: |
          aws ecs describe-task-definition --task-definition fargate-node-task-defn --query taskDefinition > task-definition.json
      - name: Build, tag, and push image to Amazon
        id: build-image
        env:
          ECR_REGISTRY: ${{ steps.login-ecr.outputs.registry }}
          ECR_REPOSITORY: nodejs-app
          IMAGE_TAG: latest
        run: |
          docker build -t $ECR_REGISTRY/$ECR_REPOSITORY:$IMAGE_TAG .
          docker push $ECR_REGISTRY/$ECR_REPOSITORY:$IMAGE_TAG
          echo "::set-output name=image::$ECR_REGISTRY/$ECR_REPOSITORY:$IMAGE_TAG"
      - name: Fill in the new image ID in the AWS ECS task definition
        id: task-def
        uses: aws-actions/amazon-ecs-render-task-definition@v1
        with:
          task-definition: task-definition.json
          container-name: nodejs-app-container
          image: ${{ steps.build-image.outputs.image }}
      - name: Deploy AWS ECS task definition
        uses: aws-actions/amazon-ecs-deploy-task-definition@v1
        with:
          task-definition: ${{ steps.task-def.outputs.task-definition }}
          service: fargate-node-service
          cluster: fargate-node-cluster
          wait-for-service-stability: true
Please note that we've added permissions to read the contents of the token generated by AWS.
Once the Github job is executed, you can access the application load balancer url and you'll be able to see products(which comes from / endpoint of our nodejs app.
