The Beginner's guide to Github Actions
What are Github Actions
Github actions let you to automate your development workflows. For example, when you push your code to a branch, you want the tests to run before code review. You can do that by using Github Actions.
Terminologies in Github Actions:
Job & Steps:
A job may contain one or more steps to run. For example, you can create a job by name build which may contain following steps
- Checkout the code
- Install packages
- Run the tests
All the steps in the job will run sequentially.
Workflow:
A workflow may contain one or more jobs. For example, you can have a workflow by name build-and-deploy and it may have couple of jobs build and deploy respectively
A workflow is defined using a yaml file and it will be hosted alongside your repository in the folder /github/workflows/ . Your github repository may contain one or more workflows.
Trigger:
Trigger is an event that starts the workflow to execute. Trigger may be event which happens at your repository - for example, trigger could be push event or pull request. Or it could be some external event or it could be based on cron schedule. We’ll the real-world use cases for each of these scenarios later in this article.
Runner:
Runner is an application that runs the jobs you define in a workflow. These runners can be hosted in hosted virtual environments or you can host it in your own environment.
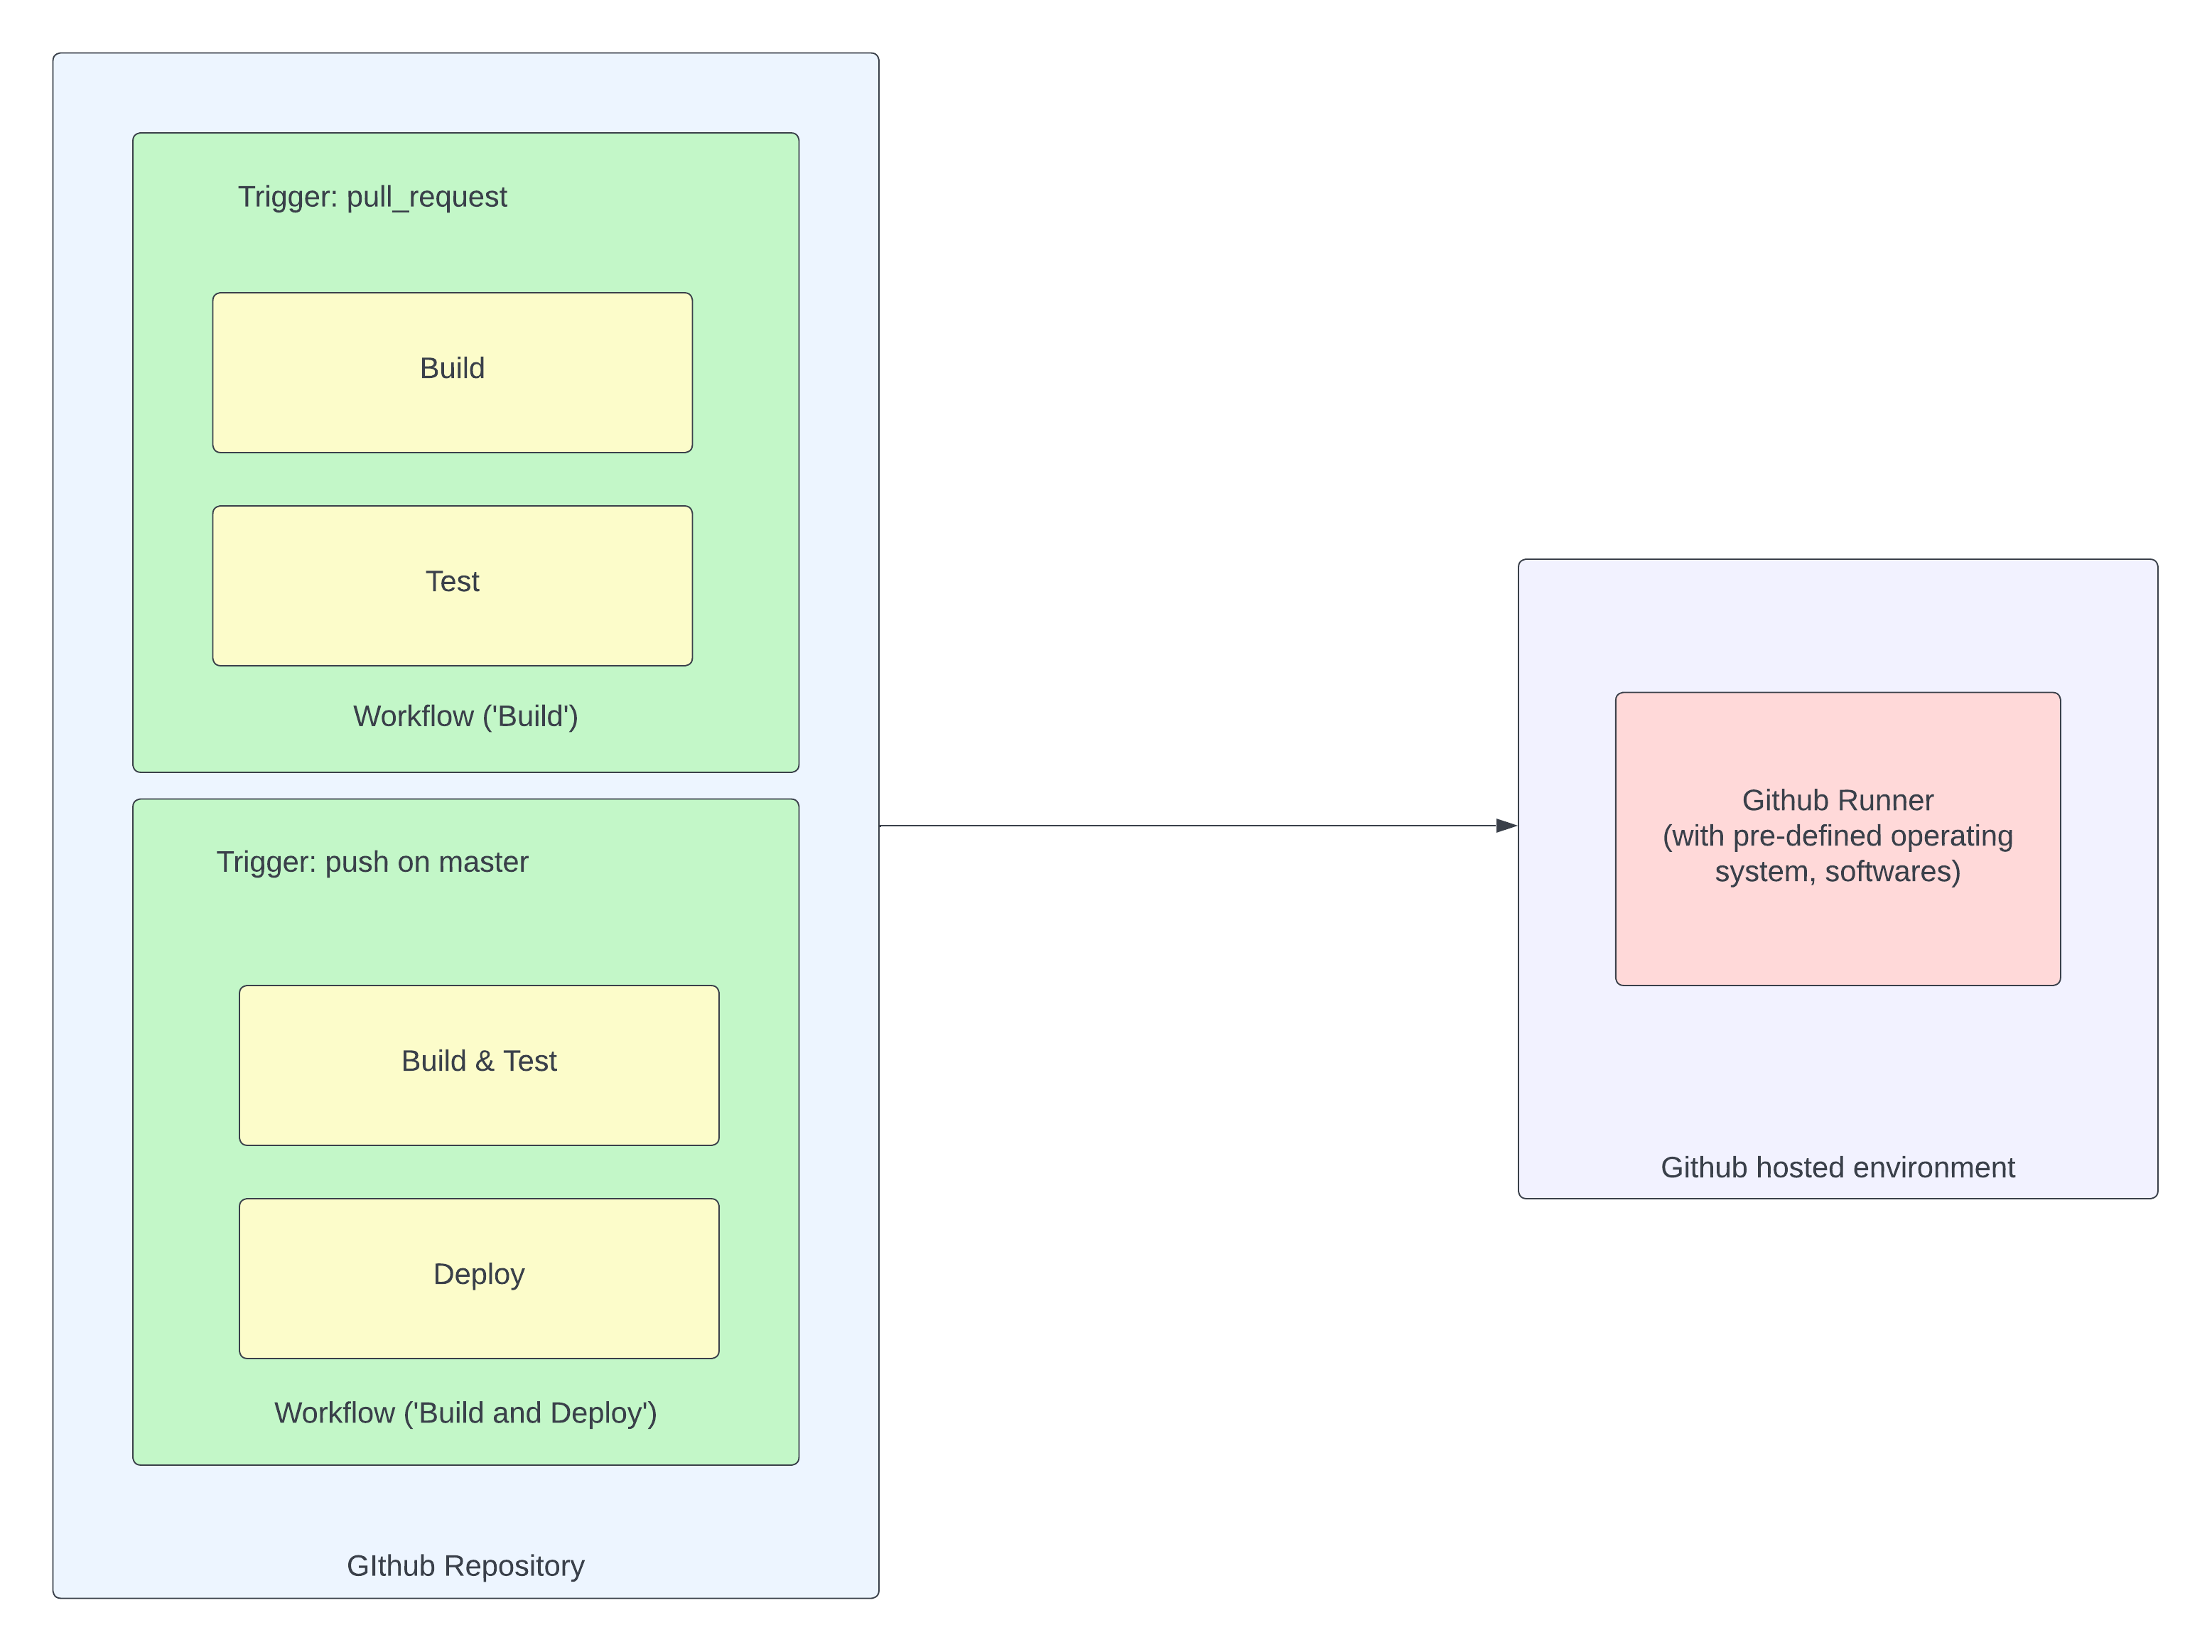
In the above diagram, jobs are represented by yellow boxes, green boxes represent workflow. Your github repository can have many workflows and each workflow can have many jobs. As soon as trigger happens, Github will execute the jobs through either Github hosted runner or even you can use self hosted runner.
Creating your first github workflow:
I've created a simple repository with only readme file in it. Now, we're going to create our first workflow. All workflows reside at .github/workflows directory. This .github directory should be created at the root directory with respect to your repo. I've created a workflow by name basics.yml as shown in below picture.
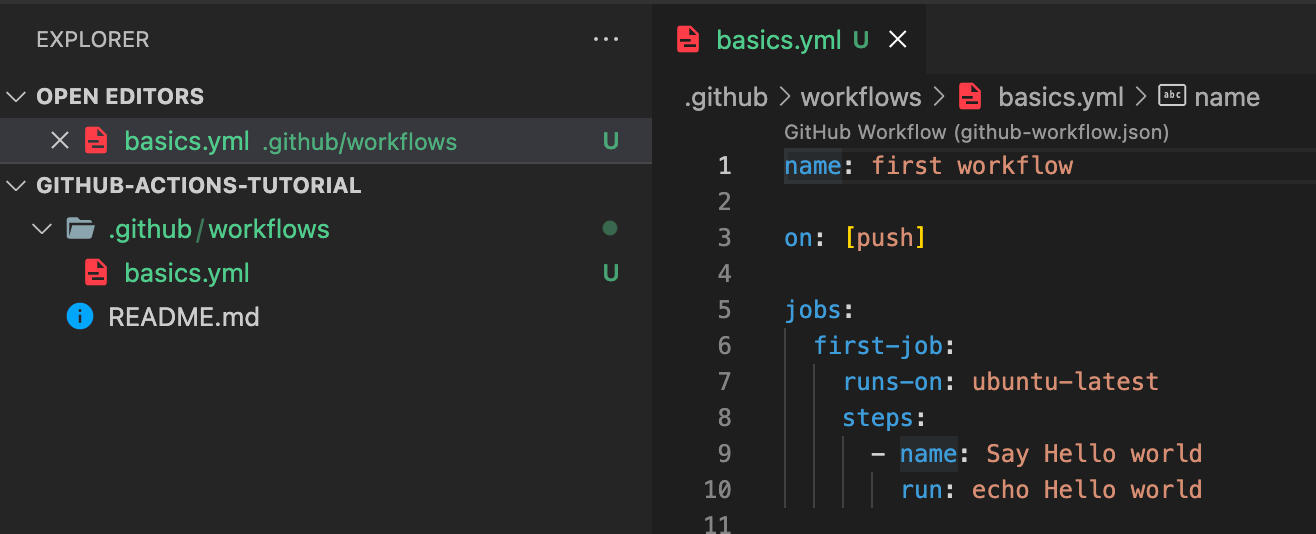
Name of the workflow:
In the first line, we're mentioning about the name of the workflow. You can give any meaningful name for your workflow - I've named this workflow as 'first workflow'.
Trigger:
At line 3, we're mentioning the trigger for this workflow - I want this workflow to be executed when someone pushes code changes into the repo. A workflow could be triggered by multiple events. We'll discuss more on this later.
Jobs & Steps:
A workflow may contain one or more jobs. Jobs should be defined in the jobs section as shown at line 5. At line 6, we're defining a job by name first-job . Each job can run in its own environment - here we chose to run this job in a github hosted environment with latest ubuntu operating system.
All the steps in a job should come under the section steps as we've done at line 6. This job has one step. The name of the step is Say Hello world and it runs a simple echo command
Once you can commit these changes and push the changes, this workflow will get executed. Now, go to your repository and click Actions tab and click on the job on left hand side pane - you'll be able to see the log of your workflow.
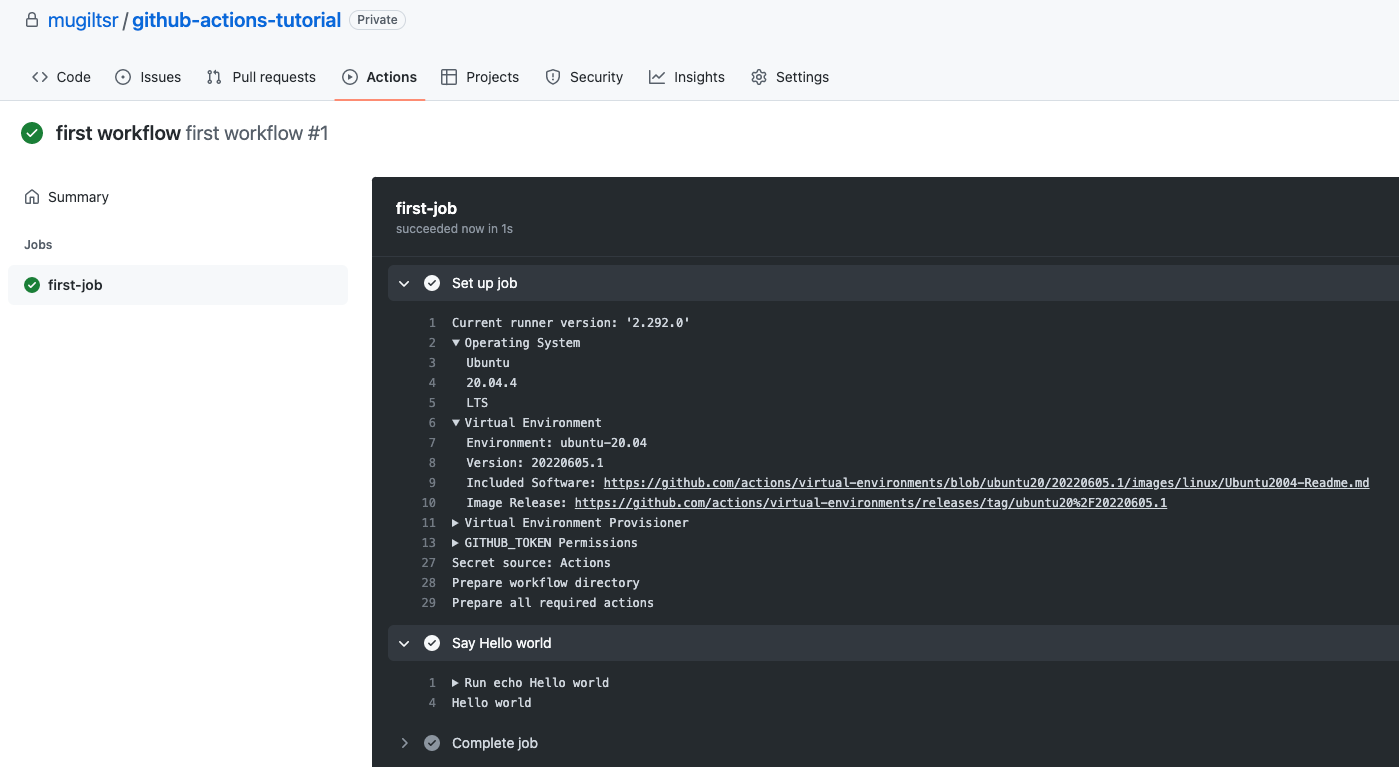
Even though we've created a job with a single step, you could see 3 steps. The first one is Set up job where we can get to know the environment details. Github is using Ubuntu 20.04.4 as we've mentioned to use the latest version of ubuntu.
In the step 'Say Hello world`, github prints 'Hello world' as we expect.
Updating your workflow
Having created our first workflow, let us update our workflow by adding another step in the job. I've added a step by name 'Multi line step' as shown in below code snippet. If you want to run multiple commands in a step, you need to use the pipe symbol (|) and then you can mention commands to run in subsequent lines.
name: first workflow

on: [push]

jobs:
  first-job:
    runs-on: ubuntu-latest
    steps:
      - name: Say Hello world
        run: echo Hello world

      - name: Multi line step
        run: |
          pwd
          ls
Commit this change and push your code. Go to github console and select Actions tab as you've done earlier. You would see result like below.
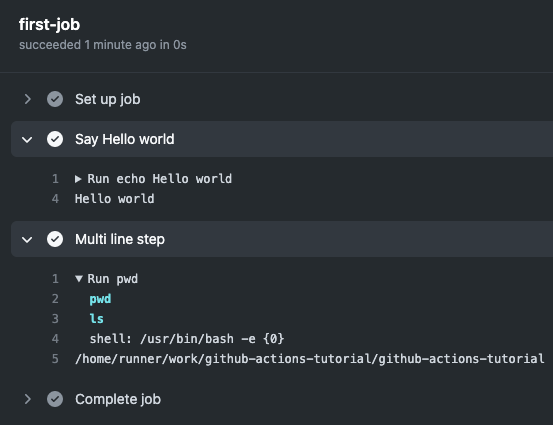
The command pwd prints the value /home/runner/work/<your-repo>/<your-repo> This is the directory (in github hosted runner) that workflow is executing our job. Please note that there is no output for our command ls. This is not an error. Github workflow does not checkout your code repository by default. To checkout your github repo, you need to execute git command manually or you can use existing github action.
Using existing Github Action:
You don't need to run multi-line commands for a complex scenario. There are many github actions readily available which you can use. If you're a developer, you might be using many external packages in your application to perform a specific task. Using existing github actions in your workflow is similar to that.
There is github actions marketplace - from which you can choose any action based on your needs. If you're used npm, this is simliar to that. These actions were developed based on needs of common scenarios one might face during development of workflows.
Coming back to our discussion on checking out the code, instead of executing git command manually - you can use actions/checkout@v3 action, as shown in below code snippet
name: first workflow

on: [push]

jobs:
  first-job:
    runs-on: ubuntu-latest
    steps:
      - name: Listing contents before checkout
        run: |
          pwd
          ls

      - name: checkout code
        uses: actions/checkout@v3

      - name: Listing contents after checkout
        run: |
          ls
When this action is executed, you can see the logs as shown below.
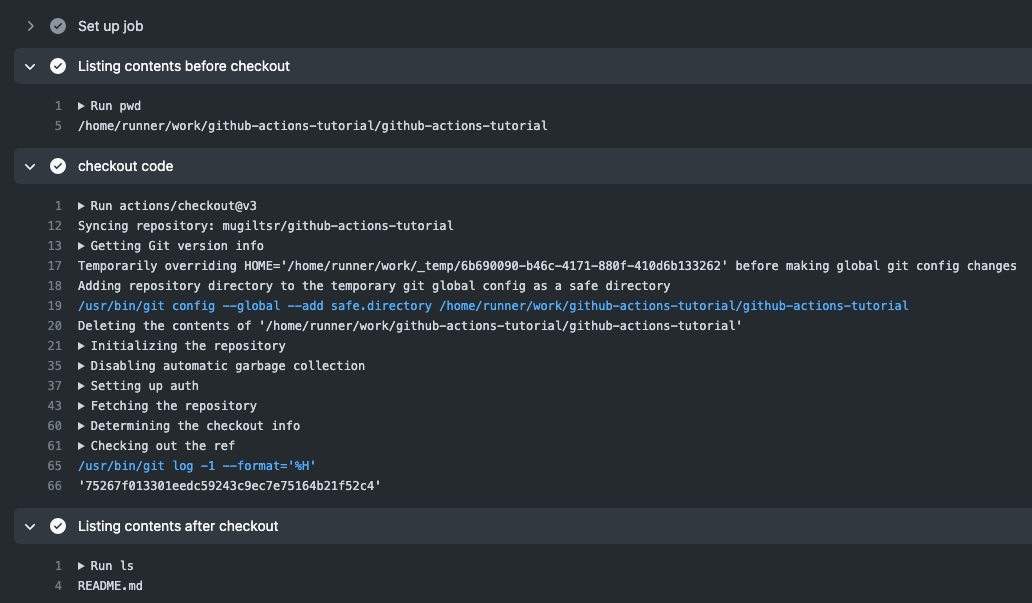
At the last step Listing contents after checkout, you can see the file 'README.md' checked out. This is the only file that we have in our repository.
The difference between manually executing the command and using checkout github action is that many of the steps are simplified. For example, authentication is handled automatically. So, it is advisable to use github actions from renowned creators as they may have handled edge cases that we might not have thought. As any one can publish github action, it is necessary to verify the credibility of the creator before using that github action.
Operating System & Shells:
So far, we've used ubuntu as our operating system for running jobs. If you want to build Apple iPhone App, you have to use macos . You've many options to choose from - macos-latest, windows-latest , ubuntu-latest or you can use earlier versions of macos, ubuntu or windows. Even you can run your job on container with custom docker image. We'll discuss about later in this tutorial.
name: environments workflow

on: [push]

jobs:
  windows-job:
    runs-on: windows-latest
    steps:
      - name: using powershell
        shell: pwsh
        run: Get-Location
  macos-job:
    runs-on: macos-latest
    steps:
      - name: running in mac
        shell: bash
        run: echo Hello world
  linux-job:
    runs-on: ubuntu-latest
    steps:
      - name: running in ubunutu
        shell: bash
        run: echo Hello world
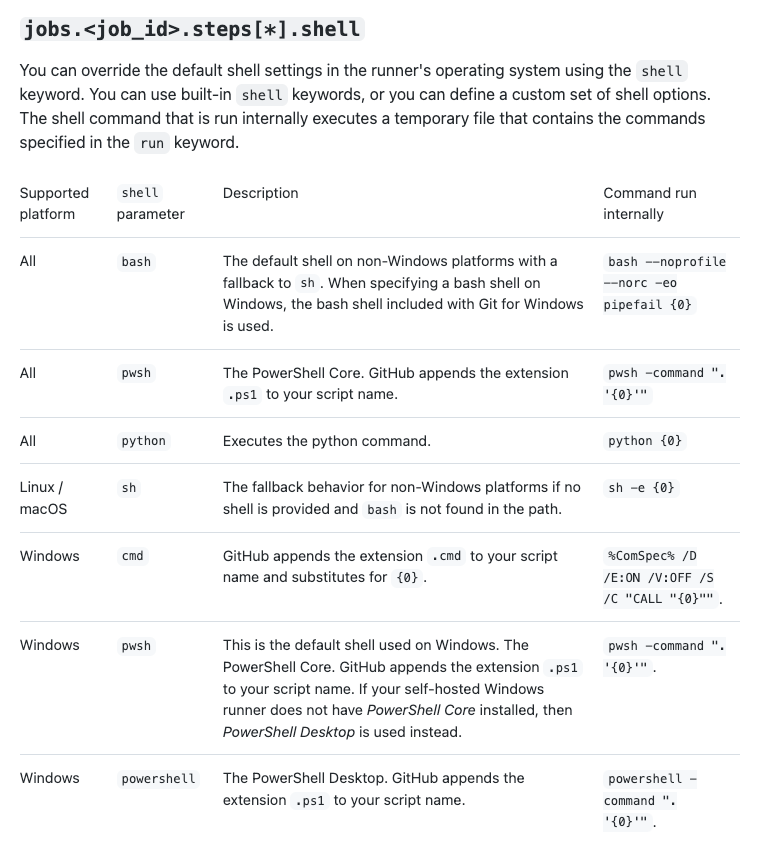
In the above workflow, we're having 3 jobs - each running in its own operating system. For the job windows-job, we're using windows operating system and using pwsh shell. We're using bash shell for the jobs running in mac-os and ubuntu. You can see the list of environments along with the associated shell here
Below is the screenshot taken from that link.
Below is the result of workflow as seen in Actions tab of github console.
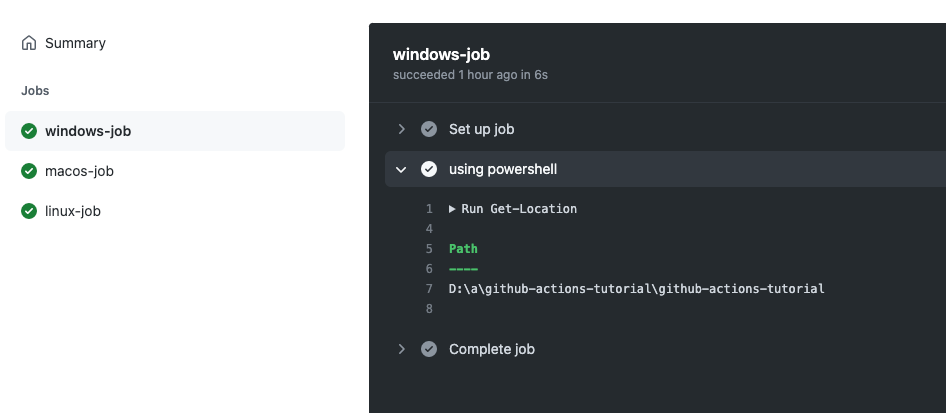
Please note that all jobs run in parallel, unless specified otherwise.
Dependency between jobs:
If you want a job to be executed in a specific order, you can mention the dependency needs of that particular job.
I've created a new workflow(job-dependency.yml) in the same repo to demonstrate this, as shown below.
There are 3 jobs in this workflow and we want each job to executed one after the other. For example, we want checkout-job to be executed first and then install-packages-job and then run-test-job . We're just running echo commands in each of these jobs - as my primary objective is to explain dependency behaviour between jobs.
name: job-dependency

on: [push]

jobs:
  checkout-job:
    runs-on: ubuntu-latest
    steps:
      - name: Simulate Checkout
        run: echo checking out
  install-packages-job:
    runs-on: ubuntu-latest
    needs: ["checkout-job"]
    steps:
      - name: Simulate install packages
        run: echo installing packages
  run-test-job:
    runs-on: ubuntu-latest
    needs: ["install-packages-job"]
    steps:
      - name: Simulate test
        run: echo running test
There is needs parameter in a job in which you can mention about the dependency of the job. For example, in install-packages-job I've mentioned checkout-job as its dependency. So, Github actions will run checkout-job to be executed before running install-packages-job . We've done the same for run-test-job
Even in Actions tab of github console, you can see the dependency visually

Whereas, in mutually independent jobs, visual representation would look something like below

Disabling the workflow:
During the course of this tutorial, we've created few workflows to demonstrate different capabilities of Github Actions. You might have noticed that the trigger for all of these workflows is push event. Whenever you push changes to the Github repository, all workflows would run as they all have same trigger event.
To resolve this issue, you can disable the workflow manually using Github console. Select the Actions tab in your Github console and select the workflow that you want to disable, click the three dots as shown in the below picture and select "Disable workflow" option from the drop-down menu.

Environment variables:
When you run any workflow, Github Actions exposes a set of default environment variables. Let us discuss about some of these variables.
HOME: This is the home directory in Github runner. This would have value as /home/runner
GITHUB_WORKFLOW: Name of your github workflow. In this case, it would be 'Environment variables'
GITHUB_REPOSITORY: Name of your repository
GITHUB_EVENT_NAME: Name of the event which triggered the workflow
GITHUB_SHA: The commit id
GITHUB_ACTIONS: This would print true as we're running though Github Actions. This parameter could be used in your integrating test cases, if needed just to know whether the code is executed in CI mode
GITHUB_REF: Branch name from which workflow is executed
Let us create a simple workflow to print these environment variables.
name: Environment variables
on: push

jobs:
  environment-variables:
    runs-on: ubuntu-latest
    steps:
      - name: print default environment variables
        run: |
          echo "HOME: ${HOME}"
          echo "GITHUB_WORKFLOW: ${GITHUB_WORKFLOW}"
          echo "GITHUB_REPOSITORY: ${GITHUB_REPOSITORY}"
          echo "GITHUB_EVENT_NAME: ${GITHUB_EVENT_NAME}"
          echo "GITHUB_WORKSPACE: ${GITHUB_WORKSPACE}"
          echo "GITHUB_SHA: ${GITHUB_SHA}"
          echo "GITHUB_REF: ${GITHUB_REF}"
          echo "GITHUB_ACTION: ${GITHUB_ACTION}"
          echo "GITHUB_ACTIONS: ${GITHUB_ACTIONS}"
          echo "GITHUB_ACTOR: ${GITHUB_ACTOR}"
When the above workflow is executed, you would see something like below.

Even you can create custom environment variables in your workflow. Environment variables are declared using env object as shown in line 3 of below snippet.
You can define environment variables at different scopes - at workflow level, at job level, at step level. The environment variable defined at workflow level( WF_ENV in below code) would be available all through workflow file across all jobs. The environment variable defined at job level ( JOB_ENV in our case) is available to the job in which it is defined and it can accessible for all the steps in the job. An environment variable defined at step level ( STEP_ENV in our case) is accessible only for that step.
name: Environment variables
on: push
env:
  WF_ENV: This is env variables scoped at workflow level

jobs:
  custom-env:
    runs-on: ubuntu-latest
    env:
      JOB_ENV: This is env variable scoped at job level
    steps:
      - name: step 1 in custom-env job
        env:
          STEP_ENV: This is environment variable scoped at step level
        run: |
          echo "WF_ENV: ${WF_ENV}"
          echo "JOB_ENV: ${JOB_ENV}"
          echo "STEP_ENV: ${STEP_ENV}"
      - name: step 2
        run: |
          echo "WF_ENV: ${WF_ENV}"
          echo "JOB_ENV: ${JOB_ENV}"
          echo "STEP_ENV: ${STEP_ENV}"
  custom-env-2:
    runs-on: ubuntu-latest
    steps:
      - name: step 1 in custom-env-2 job
        run: |
          echo "WF_ENV: ${WF_ENV}"
          echo "JOB_ENV: ${JOB_ENV}"
          echo "STEP_ENV: ${STEP_ENV}"
Output of job custom-env is
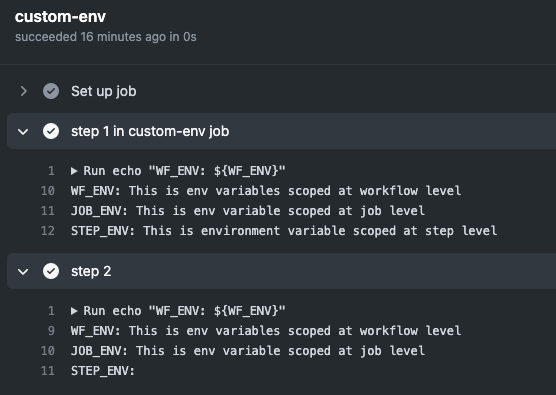
As you can see, the value of STEP_ENV in step is empty as that environment variable is defined only in previous step and can be accessible only from there.
Output of custom-env-2 job:
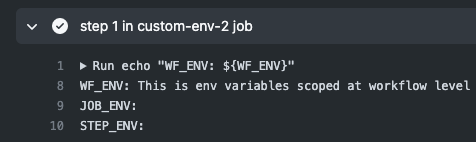
The values of JOB_ENV and STEP_ENV are printed as empty as these values could not be accessible as they're defined in previous job. Please note that you should not use any sensitive data directly in environment variables directly.
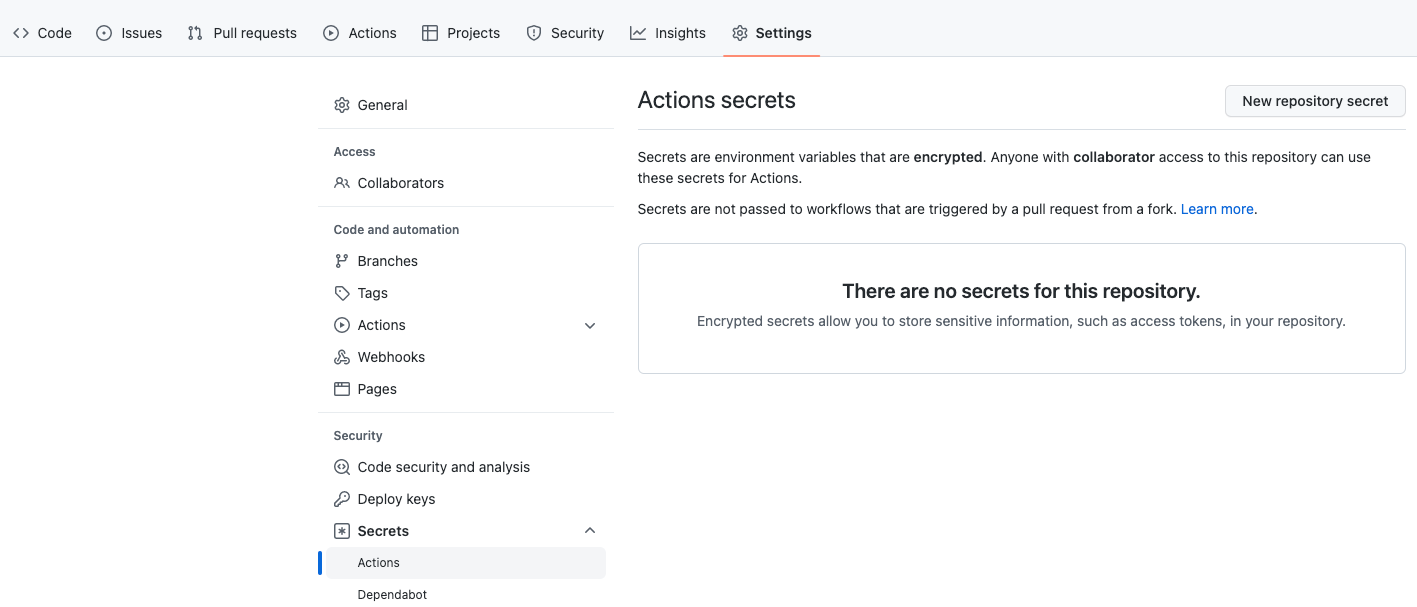
Secrets:
If you want to use any sensitive data in your workflow, you can use Github secrets for that. Go to Github console and on your repository, select Settings tab and select Secrets -> Actions from left hand side menu. Click on "New Respository secret" button
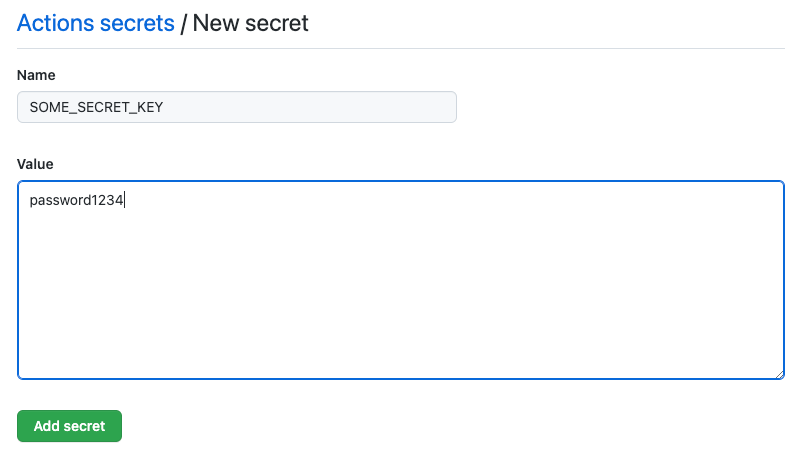
Secret is just key-value pair. I've created a new secret by name SOME_SECRET_KEY with value as 'password1234'. Please note that value of the secret cannot be seen once you've created the secret. Although, you can update the secret with new value.
Then you can use secret using secrets object as shown below
  secret:
    runs-on: ubuntu-latest
    steps:
      - name: using github secret
        run: |
          echo "SOME_SECRET_KEY: ${{secrets.SOME_SECRET_KEY}}"
When you see the log for this job in Github console - Github would mask the secret - as shown below

Github Context:
When Github Actions runs any workflow, it has its own context. Context is nothing but a collection of variables that are available to you when you execute the workflow. Below workflow code is taken from official Github Actions docs where we log different contexts.
name: context
on: push

jobs:
  dump_contexts_to_log:
    runs-on: ubuntu-latest
    steps:
      - name: Dump GitHub context
        id: github_context_step
        run: echo '${{ toJSON(github) }}'
      - name: Dump job context
        run: echo '${{ toJSON(job) }}'
      - name: Dump steps context
        run: echo '${{ toJSON(steps) }}'
      - name: Dump runner context
        run: echo '${{ toJSON(runner) }}'
      - name: Dump strategy context
        run: echo '${{ toJSON(strategy) }}'
      - name: Dump matrix context
        run: echo '${{ toJSON(matrix) }}'
There are several contexts available when you execute a workflow.
Github context: In the github context, you'll get the details such as commit id, repository, repository_owner, workflow, event that triggered the workflow. Event though Github masks the sensitive details such as token, it is not advisable to print all the context.
Use case: The primary use case for understanding Github context is that you can use any of the property in the context in your jobs. For example, you can use environment variables related to production, if the changes are pushed to branch using below code
name: CI
on: push
jobs:
  prod-check:
    if: ${{ github.ref == 'refs/heads/main' }}
    runs-on: ubuntu-latest
    steps:
      - run: echo "Deploying to production server on branch $GITHUB_REF"
In above example (taken from official Github docs), the if statement checks the github.ref context to determine the current branch name; if the name is refs/heads/main, then the subsequent steps are executed. The if check is processed by GitHub Actions, and the job is only sent to the runner if the result is true.
Triggers:
So far, we've used only used push event as trigger in all of our earlier workflows. There are several events exist that can trigger your workflows. At a high level, you can categorize these events into 3 categories.
- Any events that happen in your repository - push, pull_request etc..
- Scheduled events - you can run the workflow to run on a periodic schedule
- Any external event that happens outside of repository.
Please note this is not a complete categorization - this is just a categorization of most commonly used events.
Scheduled events:
You can run your Github workflows to run on a schedule. Instead of push event that we've used earlier, we need to use schedule event. This schedule event is an object which takes cron as a parameter. I want below workflow to run every 10 minutes.
name: cron job workflow

on:
  schedule:
    - cron: "*/10 * * * *"

jobs:
  cron-job:
    runs-on: ubuntu-latest
    steps:
      - name: Runs on a schedule
        run: echo this job runs on a schedule

External events:
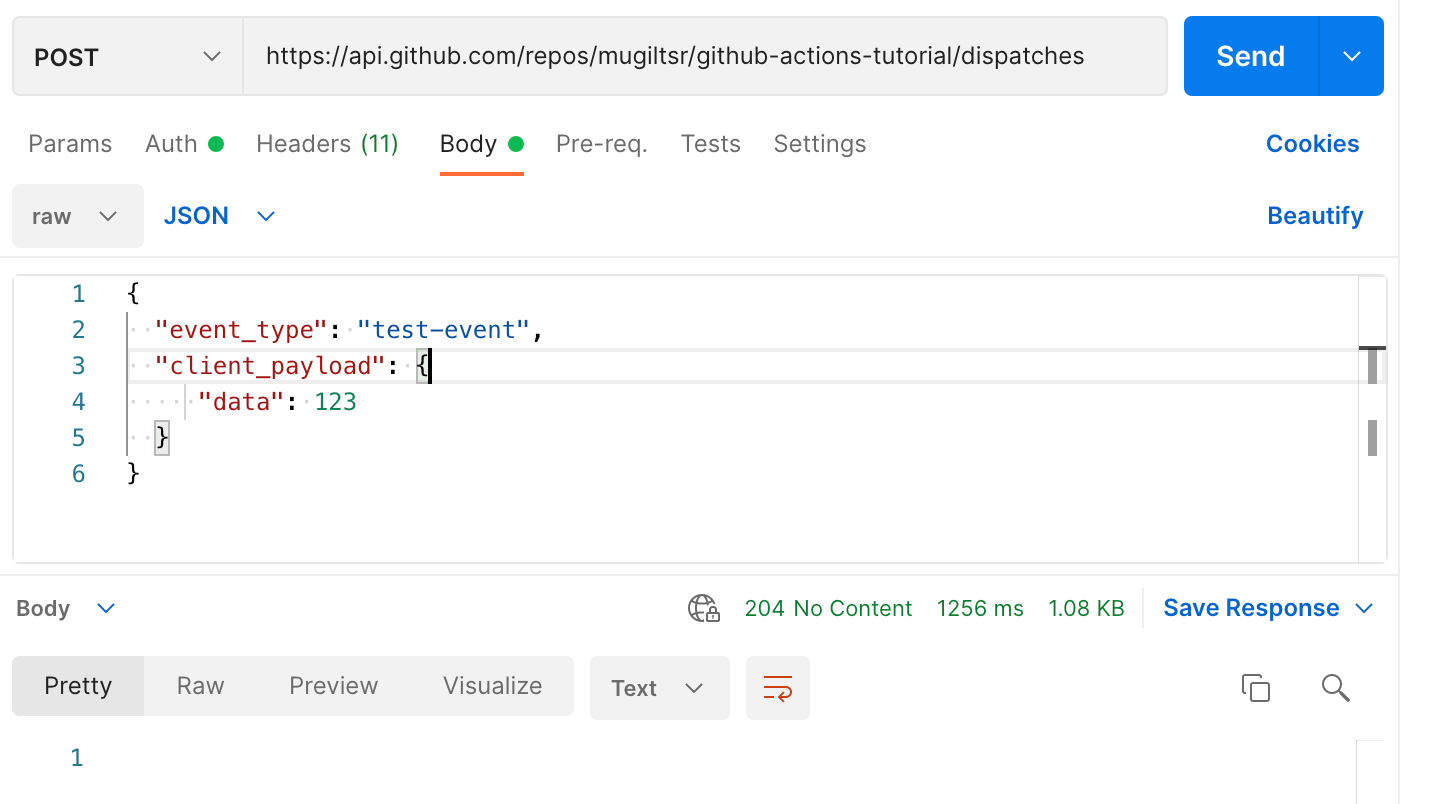
If you want to trigger a workflow based on external event - you can use repository_dispatch event. You need to fire a POST request to predefined Github endpoint so that Github Actions can trigger your workflow. The endpoint follows this format : https://api.github.com/repos/OWNER/REPO/dispatches . Below is the pictorial representation of high level event flow.

When firing POST request, you need to add below headers
- Accept: application/vnd.github.v3+json
- Authentication header: With the personal token with
repoaccess
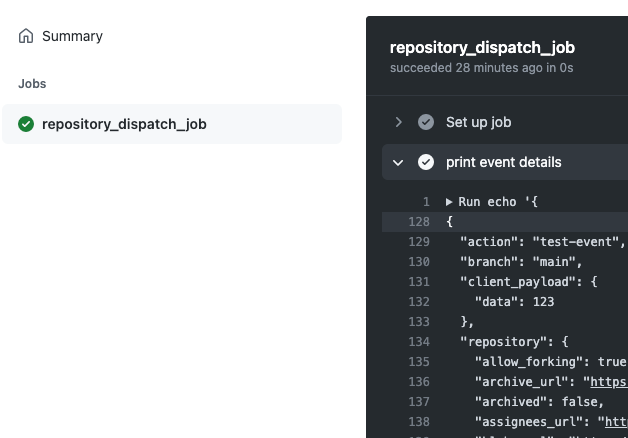
And, body of the request have properties: event_type and client_payload.
{
  "event_type": "test-event",
  "client_payload": {
     "data": 123
  }
}
The property event_type tells the type of event that is happening. This event type could be used in a workflow so that you can make a workflow to be triggered for specific events. You can use the optional property client_payload for adding any extra details about the event.
Once you fire the event with appropriate Accept and auth header, you'll get 204 successful response - as shown below
Your Github console would look something like below
Use case: Upon successful completion of build workflow, you can post a message in internal slack channel with a link to deploy. Upon clicking that link, you can fire POST request to Github endpoint so that you can deploy the application in staging environment.
Repository events:
You can even drill down further to choose the branches from which these events occur.