How to run docker containers in AWS Lambda - along with CI/CD pipeline
In this article, you're going to learn about how to run docker containers in AWS Lambda. Before discussing how to do that, let us discuss the need of running the lambda using docker.
The Python version of this article is available here
Sometimes, your lambda function may require a huge number of dependencies or dependencies with large sizes. As you may know, the maximum size of packaged lambda is 250 MB. But if your package exceeds that limit, you can make use of docker containers as the maximum size of a docker image is 10GB.
Even though you're running docker containers in lambda, still you need to implement lambda API and the restriction of a maximum of 15 minutes of the execution time of lambda still applies.
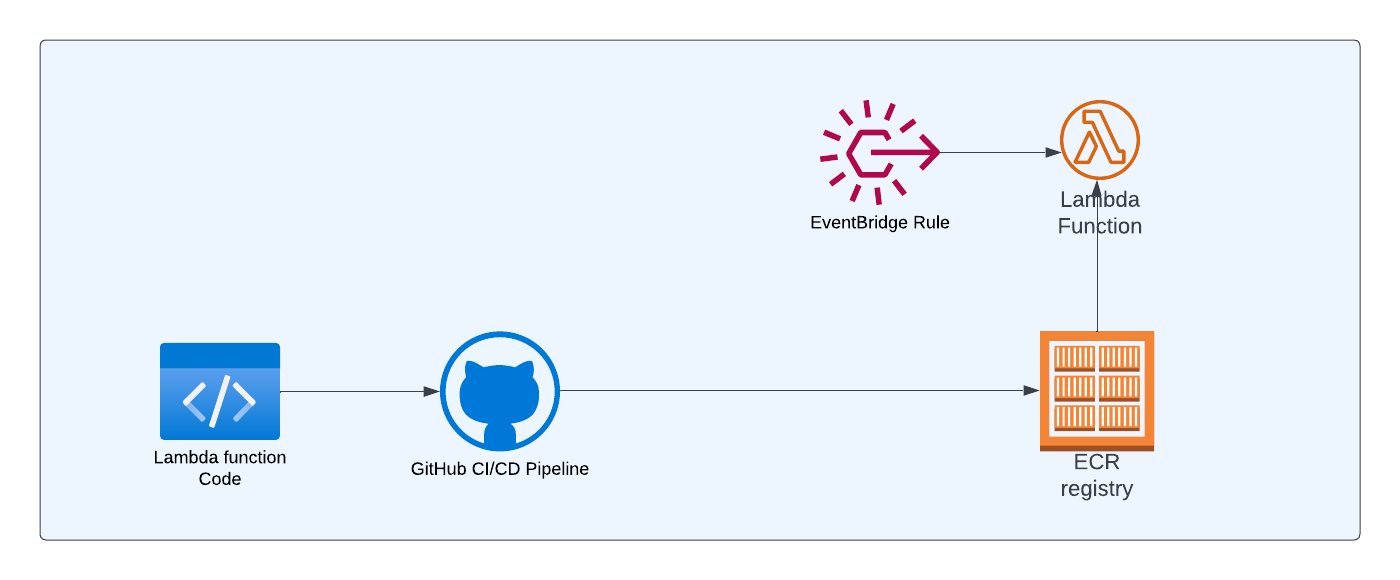
Architecture
Below is the high-level architecture diagram of the simple application that we're going to build in this article

Lambda function code: This is where your application logic resides. We'll be creating DockerFile in this repository so that we can package the code as docker image
GitHub CI/CD Pipeline: Whenever code is pushed into the remote branch, we want the GitHub workflow to run which in turn will build and push the image to the AWS ECR repository
Lambda function: This lambda function will refer to the image in the ECR repository
Eventbridge Rule: We'll create an event bridge rule to create a schedule so that lambda can be triggered periodically based on the schedule.
Now, let's create an actual application.
Lambda with Docker
We're going to use nodejs framework in this example. Create a new folder and initialize the project
mkdir docker-lambda
cd docker-lambda
npm init -y
We're going to use TypeScript for writing our lambda function and we're going to install esbuild (as dev dependency) to convert our typescript code to javascript code.
npm i -D esbuildWe also install the @types/aws-lambda package as a dev dependency for getting type definitions of aws-lambda
Lambda function
I'm keeping my lambda functions pretty simple with a couple of log statements. In the real world, you'll be using a huge number of dependencies (or dependencies with large sizes), if you're using docker in lambda.
import { Context, APIGatewayProxyResult, APIGatewayEvent } from 'aws-lambda';

export const handler = async (
  event: APIGatewayEvent,
  context: Context
): Promise<APIGatewayProxyResult> => {
  console.log(`Event: ${JSON.stringify(event, null, 2)}`);
  console.log(`Context: ${JSON.stringify(context, null, 2)}`);
  return {
    statusCode: 200,
    body: JSON.stringify({
      message: 'Running this handler from docker',
    }),
  };
};
Now, update the build script in package.json to convert typescript to javascript code using esbuild
 "scripts": {
    "build": "esbuild index.ts --bundle --minify --sourcemap --platform=node --target=es2020 --outfile=dist/index.js"
  },
Dockerfile
We've created a lambda function and build script. Now, it is time to create Dockerfile so that we can create a docker image of this lambda function that we wrote earlier.
One of the requirements of using docker with lambda is that the base image that you use must implement the runtime interface client to manage the interaction between lambda and function code.
AWS provides many base images which already implement the runtime API that you can use. One such image is public.ecr.aws/lambda/nodejs:16
Based on your language/framework - AWS provides many such base images here
Below is the Dockerfile for lambda. This is a multi-stage build so that we can reduce the size of the final image.
FROM public.ecr.aws/lambda/nodejs:16 as builder
WORKDIR /usr/app
COPY package.json index.ts  ./
RUN npm install
RUN npm run build


FROM public.ecr.aws/lambda/nodejs:16
WORKDIR ${LAMBDA_TASK_ROOT}
COPY --from=builder /usr/app/dist/* ./
CMD ["index.handler"]
The first 5 lines belong to the build stage and the last 4 lines are creating the final image.
Build stage:
In the build stage, we're using the base image (which implements the Runtime API) provided by lambda. We set the WORKDIR and copy package.json and index.ts to that directory. Then, we install and run the build.
Creating the final image:
We're using the base image of AWS lambda and setting the WORKDIR as LAMBDA_TASK_ROOT . LAMBDA_TASK_ROOT is a reserved environment variable used by AWS lambda which contains the path of the lambda function code. As we want to copy the built files(javascript files that came out of build command) to this path, we're using this predefined reserved environment variable. And, finally, we use the start command.
Infrastructure
As mentioned earlier, even though you use Docker with lambda, Lambda still works in the same way as earlier. Lambda will be executed as a result of some event - This event could be uploading the file to S3 or someone firing an HTTP event on API Gateway or a message to an SQS or from SNS and so on.
To make things simple, we're going to use EventBridge to create a schedule so that this lambda can be triggered periodically.
We're going to create a simple CDK project. This project will have 2 stacks - one for creating ECR Repository (let's call this RepoStack ) and another (let's call this LambdaStack ) for creating an event schedule.
The reason why we're creating 2 stacks is because of the dependency
- The first stack is for creating ECR Repository
- The second stack is for creating lambda function with the ECR image (to be provided by CI/CD pipeline) and for creating event schedule
Even though we create 2 stacks in the CDK project, we'll deploy the first stack and then build CI/CD pipeline so that image can be pushed to the ECR repository, and then finally we'll deploy the second stack.
mkdir docker-lambda-stack
cd docker-lambda-stack
cdk init app --language=typescript
Stack for creating ECR repository:
Below is the CDK code for creating the ECR repository.
export class AwsCdkDockerLambdaRepoStack extends cdk.Stack {
  constructor(scope: Construct, id: string, props?: cdk.StackProps) {
    super(scope, id, props);

    const repo = new ecr.Repository(this, 'dockerLambda', {
      repositoryName: 'docker-lambda',
    });
  }
}
This is a pretty simple code where we just have to mention the name of the repository through the property repositoryName for the construct
Stack for creating Lambda and event schedule:
Below is the code for creating lambda and event schedule to trigger the lambda
export class AwsCdkDockerLambdaStack extends cdk.Stack {
  constructor(scope: Construct, id: string, props?: cdk.StackProps) {
    super(scope, id, props);

    const repo = ecr.Repository.fromRepositoryName(
      this,
      'dockerLambda',
      'docker-lambda'
    );

    const dockerLambda = new lambda.DockerImageFunction(
      this,
      'DockerLambdaFunction',
      {
        code: lambda.DockerImageCode.fromEcr(repo),
      }
    );

    const every5MinRateER = new events.Rule(this, 'every5MinRateER', {
      schedule: events.Schedule.expression('rate(5 minutes)'),
    });

    every5MinRateER.addTarget(new targets.LambdaFunction(dockerLambda));
  }
}
First, we're referring to the repo that we created earlier in another CDK stack. Please note that we're NOT creating a new repository here - we're just referring to the existing repository that we've created. Then, we create a lambda with code from the ECR repository image
And finally, we create an event schedule to run every 5 minutes and add lambda as a target for the event schedule. You can use any type of event (S3, SQS, SNS, etc..) to trigger lambda. Just for the sake of simplicity, I've created an event schedule.
Wiring the stacks in the CDK App:
You can modify the CDK App (located in the bin folder) as below
const app = new cdk.App();
new AwsCdkDockerLambdaRepoStack(app, 'RepoStack', {});
new AwsCdkDockerLambdaStack(app, 'LambdaStack', {});
Deploying the first stack:
You can deploy the first stack by executing the below command
cdk deploy RepoStackThis will create an ECR repository by name docker-lambda . Please note that we can't deploy the second stack as we don't have any images in the ECR repository yet. The image for the ECR repository would be pushed by the CI/CD pipeline which we're going to create next
CI/CD pipeline
The steps involved in creating a CI/CD pipeline for the lambda with docker is pretty simple. You just need to check out the code. Then build, tag, and push the image to ECR
We're going to create CI/CD pipeline using GitHub Actions. If you're new to GitHub Actions - I've written a beginner's guide to GitHub Actions. Please read that first before proceeding.
Create a folder .github/workflows in the root of your folder(where your lambda code is located) and create file by name deploy.yml
Below is the code for deploy.yml file. Let me explain what the line in this workflow file does.
name: build & deploy lambda docker image to ECR

on: [push]

jobs:
  deploy-lambda-docker-image:
    runs-on: ubuntu-latest
    permissions:
      id-token: write
      contents: read
    steps:
      - name: checkout code
        uses: actions/checkout@v3
      - name: Configure AWS Credentials
        uses: aws-actions/configure-aws-credentials@v1
        with:
          role-to-assume: arn:aws:iam::853185881679:role/github-actions
          aws-region: us-east-1
      - name: Login to AWS ECR
        id: login-ecr
        uses: aws-actions/amazon-ecr-login@v1
      - name: Build, tag, and push image to Amazon
        id: build-image
        env:
          ECR_REGISTRY: ${{ steps.login-ecr.outputs.registry }}
          ECR_REPOSITORY: docker-lambda
          IMAGE_TAG: latest
        run: |
          docker build -t $ECR_REGISTRY/$ECR_REPOSITORY:$IMAGE_TAG .
          docker push $ECR_REGISTRY/$ECR_REPOSITORY:$IMAGE_TAG
          echo "::set-output name=image::$ECR_REGISTRY/$ECR_REPOSITORY:$IMAGE_TAG"
name: The name property represents the name of the workflow. You can name anything you want
on: We want this workflow to be executed on push so that if any code is pushed to the remote branch - we want this workflow to run
jobs: We have a single job deploy-lambda-docker-image and it runs on ubuntu-latest
Instead of storing access key and secret key in your repository secrets, you can use OIDC from GitHub to connect to AWS. This approach is more secure and is recommended. And, we've added the required permissions to read the token.
Steps:
checkout code: As the name implies, we're checking out the code in this step
Login to AWS ECR: In this step, we're logging into the ECR service
Build, tag and push image to Amazon : In this step, we're building the image, tagging it, and pushing it to ECR
Deploying the Event Schedule with Lambda
Now, it is time to deploy the other CDK stack that we created earlier.
cdk deploy LambdaStackThis will create an event schedule and trigger the lambda based on the schedule.
Now, the lambda will be triggered every 5 minutes and you can see the log statements in the CloudWatch service
Conclusion
Hope you learned how to use Docker with Lambda using Typescript
Let me know your thoughts in the comments