The Beginner's Guide to AWS CodePipeline - Setup CI/CD Pipeline for Static Website
In this guide, you're going to learn about basics of AWS CodePipeline and learn how to setup CI/CD pipeline for static website using AWS CodePipeline. As AWS CodePipeline is a service provided by AWS, this would make more sense if you're using AWS for most of your infrastructure needs.
What is CI/CD Pipeline?
At high level, a CI/CD pipeline is nothing but a series of steps that you do to integrate your code changes to the main branch, create package and deploy the package in your destination environment. But before integrating your code, you'll be checking for linting errors, run the tests, scan for any vulnerability and so on. You'll be doing all these things as part of your CI/CD pipeline. Usually, CI/CD pipeline will kick-in as soon as you check-in your code.
AWS CodePipeline:
Before discussing about how AWS CodePipeline works, let us briefly discuss about terminologies used in it.
Action: An action is a step which does some functionality. For example, it could taking the source code from your repository or building the application or anything which does something in a CI/CD pipeline. Every action would belong to a stage.
Stage: A Stage is like a phase in a CI/CD pipeline. Each stage can have one or more actions in it. Action is the step which does actually does the job and stage is a container for the actions defined in them.
Artifact: An artifact is the output of a stage.
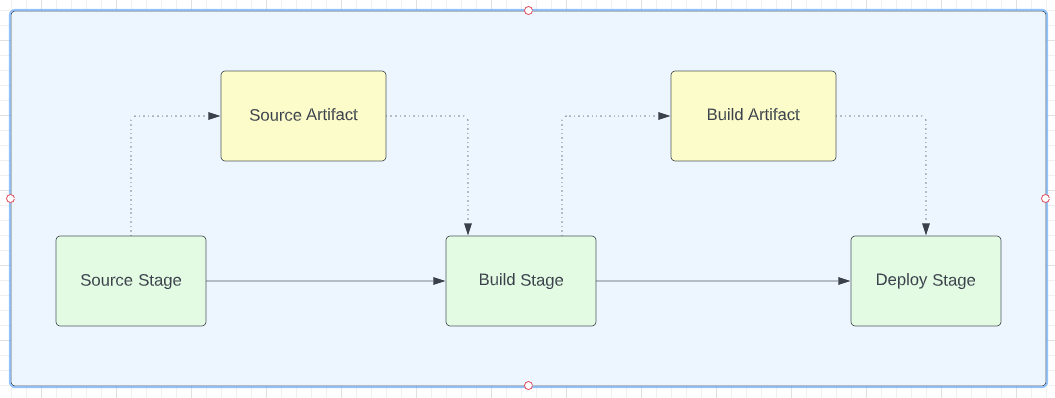
AWS CodePipeline can have 3 stages
Source Stage : This stage represents source phase of your pipeline. AWS CodePipeline provides few providers to integrate with source stage. These providers include AWS CodeCommit, Amazon S3, Github, BitBucket. AWS CodeCommit is git based version control from AWS. If you've an existing repository with Github or BitBucket, you can use that too. For this tutorial, we're going to use AWS CodeCommit repository.
Build Stage : In the build stage, you'll be providing instructions on how to build your application. These instructions will be provided in a yaml file by name buildspec.yml in a specific format. We'll discuss about this later in this tutorial. This build stage will run in a docker container. You may specify the image and compute requirements for this container. This build stage may produce some artifact which could be used in deploy stage.
Deploy Stage: Once you've built your application, you can deploy it using this deploy stage. You can deploy the application to many services including but not limited to EC2, ECS, S3.
Below is the pictorial representation of AWS CodePipeline
CI/CD Pipeline for react application:
In this tutorial, we're going to build CI/CD pipeline for react application. However, the same process can be followed for any Single Page Applications (SPAs) such as Angular, Vue etc..
We're using AWS CDK for creating infrastructure. If you're new to AWS CDK, I strongly recommend to read this AWS CDK guide first.
Source Stage:
Source Stage requires a source. It could be a git repository, S3 Bucket, Elastic Container Registry repository or any source that AWS CodePipeline supports. We're going to use a git repository in this guide and we're going to create this git repository using AWS CodeCommit.
You can either create a new CodeCommit repository or you can refer to the existing CodeCommit repository. As I want this repository lifecycle (creation, deletion etc.. ) to be independent of CI/CD pipeline, I'm referring to existing CodeCommit repository. Another reason is that creation of code repository would be done by development team whereas creation of CI/CD pipeline would be done by devops team. Based on the culture and size of the company(Startups, for example) - I've seen both steps are carried out by development team. If you're choosing to create repository outside of CI/CD pipeline, please follow the steps below.
Creating AWS CodeCommit Repository:
Login to AWS console and select CodeCommit service and you'll be able to see below screen. Click "Create repository" button

Then, enter repository name and description as shown below
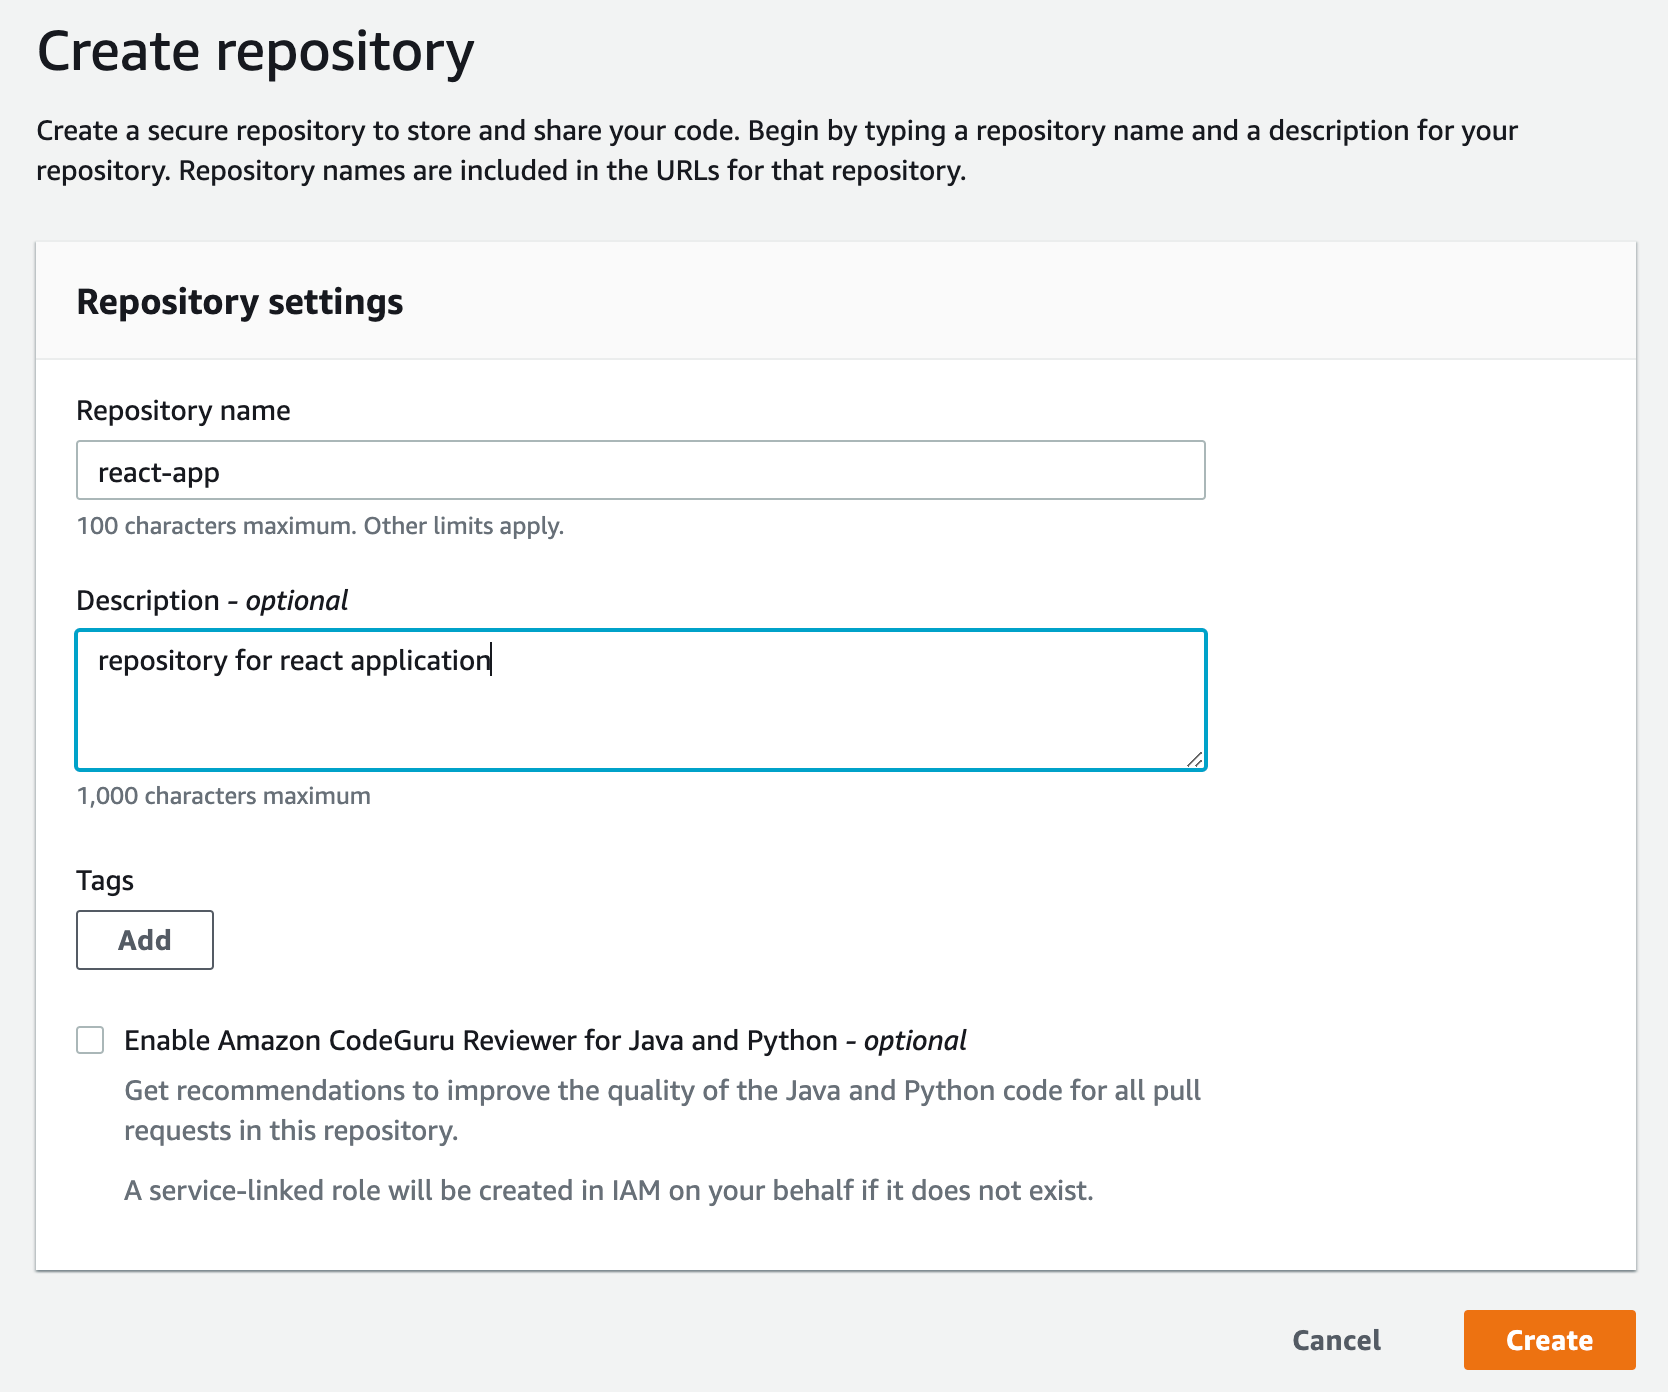
Click the button "Create" button to create repository and make note of the remote url. It'll be something like below.
https://git-codecommit.us-east-1.amazonaws.com/v1/repos/react-appPlease make sure you create the repository in AWS CodeCommit before referring it here in CI/CD Pipeline.
You can refer to the AWS CodeCommit repository as shown below. react-app is the name of the repository.
const repo = codecommit.Repository.fromRepositoryName(
      this,
      "static-website-repo",
      "react-app"
    );
Source Stage has 2 main components
- Action: which gets the code from source git repository
- Artifact: which stores the output of the action
Below is the CDK code for creating the action and output for source stage
const sourceOutput = new codepipeline.Artifact("ReactAppSourceArtifact");

const sourceStageAction = new cpactions.CodeCommitSourceAction({
  actionName: "source",
  repository: repo,
  branch: "master",
  output: sourceOutput,
  trigger: cpactions.CodeCommitTrigger.EVENTS,
});CodeCommitSourceAction: There are different source actions available in AWS CodePipeline. We're using CodeCommitSourceAction as our source is AWS CodeCommit repository. This action accepts following parameters in constructor
actionName: This is the name of the action - you can name whatever you want
repository: Reference to the repository in which this action has to be performed. We're referencing to the AWS CodeCommit repository that we've created earlier
branch: Branch name of the repository. We've mentioned master as we want the pipeline to be triggered when there is a push happens in the master branch
output : Where to store the output of this action. We're using the artifact that we've created earlier.
trigger: How AWS CodePipeline knows that we've pushed our changes to the repository? By default, it uses AWS CloudWatch events. You don't need to mention this as this is the default behaviour. Other option is to poll and get to know about the changes but that option is not recommended.
Build Stage:
As the name implies, we'll be building the application in this build stage . Build stage is bit different from other stage as we need to create a Pipeline project. Below is the CDK code for creating Pipeline project.
const buildProject = new codebuild.PipelineProject(
  this,
  "reactCodeBuildProject",
  {
    projectName: "react-app-build",
    buildSpec: BuildSpec.fromSourceFilename("./buildspec.yml"),
    environment: {
      buildImage: codebuild.LinuxBuildImage.STANDARD_5_0,
      computeType: ComputeType.SMALL,
    },
  });
CodeBuild.PipelineProject: This CDK construct accepts 3 parameters
projectName : This is the name of the build project
buildSpec: The name and path of the buildSpec file. This file contains the instructions to build the project
environment: This property specifies the image ( buildImage ) to be used for docker container and compute requirement is mentioned in computeType
Build Action:
Below CDK snippet creates CodeBuildAction and artifact for storing the output from the action. In the case of react application, the artifact will be the build folder.
const buildOutput = new codepipeline.Artifact("ReactAppBuildArtifact");

const codebuildAction = new cpactions.CodeBuildAction({
  actionName: "reactappcodebuildaction",
  project: buildProject,
  input: sourceOutput,
  outputs: [buildOutput],
  runOrder: 1,
});CodeBuildAction: This constructs accepts below parameters
actionName : The name of the action
project: The CodeBuild project this action belongs to
input: Represents input for this action. The output of source action ( sourceOutput defined earlier) is the input of this action
output : Represents where to store output for this action. We're using the artifact buildOutput which we've created earlier.
runOrder: As mentioned earlier, a stage can have multiple action. This property runOrder represents the order in which these actions have to be executed. As we've just one action - this doesn't matter. I've just included this here as I want to explain about this property :-)
Deploy Stage:
In the case of react application, the deployment stage is pretty simple - copy the build folder to AWS S3 bucket.
Below is the CDK code for creating S3 bucket and deploy action to move the build output artifact to S3 bucket.
const websiteBucket = new s3.Bucket(this, "WebsiteBucket", {
  bucketName: "cp-react-app-static-website-bucket",
  publicReadAccess: true,
  websiteIndexDocument: "index.html",
});

const deployAction = new cpactions.S3DeployAction({
  actionName: "deploytos3action",
  bucket: websiteBucket,
  input: buildOutput,
  runOrder: 1,
});
Please note that we're using S3DeployAction to deploy to S3 Bucket.
CodePipeline:
We've created each of the stages separately. Now, we need to stitch these stages together to form CI/CD Pipeline. We're going to create Pipeline construct
const pipeline = new codepipeline.Pipeline(this, "ReactCodePipeline", {
  pipelineName: "static-website-pipeline",
  crossAccountKeys: false,
  stages: [
  {
    stageName: "Source",
    actions: [sourceStageAction],
  },
  {
    stageName: "build",
    actions: [codebuildAction],
  },
  {
    stageName: "deploy",
    actions: [deployAction],
  },],
 });
stages property is an array - we mention the stages here along with associated actions here. Please note that the pipeline will execute the pipeline in the same order that has been defined here which means Source stage will execute first, then build stage and then deploy action.
Having created code repository and CodePipeline, we can deploy this stack by using below command
cdk deployIt may ask your permission to create necessary permissions and roles to deploy this stack. Enter y and CDK will deploy your stack.
When you visit CodePipeline service, you can see that our pipeline is failed - as shown below.
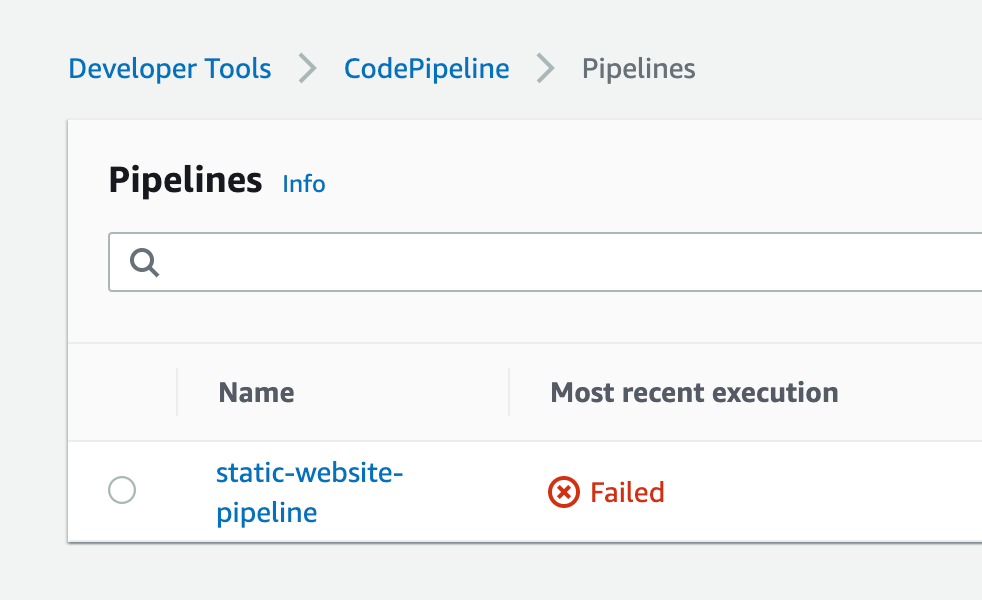
Click on the link and you'll be able to see below screen
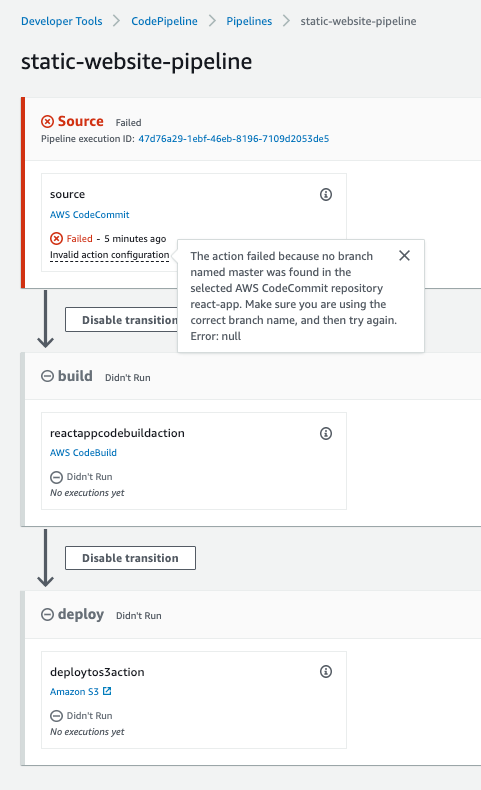
Even though the pipeline execution is failed, you can see that our CDK code created pipeline with 3 stages - source, build and deploy.
Now do a mouse hover on the error "Invalid configuration". Then, it will give you detail of the error. "no branch was found in the repository".
This makes sense as we've not pushed any code to the CodeCommit repository. Please note that at this point of time, we've created repo and pipeline but we've not pushed any code to the repository. Let us create react app in next section and push that code.
React app & BuildSpec:
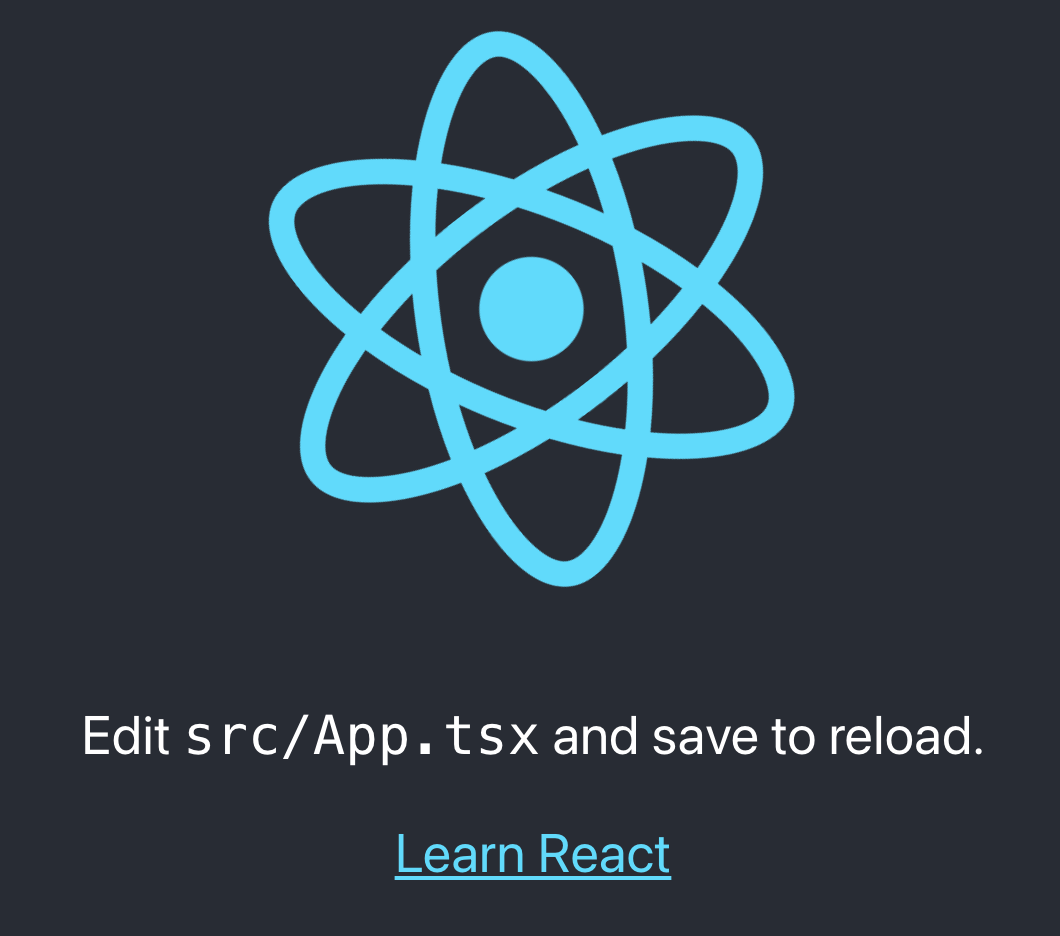
We've built pipeline. But we've not created react application yet. We can simple react app using create-react-app as shown below
npx create-react-app aws-codecommit-react-app --template typescriptWhen you run the command npm start , you can see a page like below
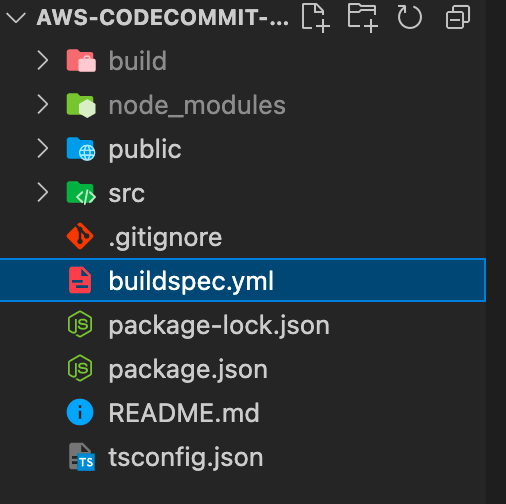
BuildSpec file:
As discussed earlier, this file in your repository contains build instructions to build your application. First the name of the file should be buildspec.yml as we've mentioned this name in buildAction CDK construct and this file should be located at the root relative to the react application code repository, as shown below.
Below is the contents of buildspec.yml file. You can refer to this article for buildspec reference.
version: 0.2
phases:
  install:
    runtime-versions:
      nodejs: 14
    commands:
      - npm i npm@latest -g
      - npm cache clean --force
  pre_build:
    commands:
      - npm install
  build:
    commands:
      - npm run build
artifacts:
  base-directory: build
  files:
    - "**/*"
version: Represents buildspec version. Latest version is 0.2.
phases : Represents different phases used in building the application. We're using install, pre_build, build phases for building this application. Additionally, post_build phase is also available - which we're not using here. Each phase will have a list of commands to be executed as part of that phase.
install phase: In this phase, we're mentioning the CodeBuild to use version 14 of nodejs . This has to be specified inside runtime-versions field as shown in above snippet.
In the first command, we're installing latest version of npm and we're cleaning npm cache in the second command.
pre_build phase: In the pre_build phase, we're installing all the dependencies by using command npm install
build phase: We're executing npm run build command to build react application. This command will create build folder at the root of current folder.
artifacts: This field represents the files or folders which needs to stored as artifcats as part of this action(BuildAction - as we've defined in AWS CodePipeline in CDK earlier)
base-directory: As the name implies, this field represents the base directory of the artifacts.
files: This field represents the files that needed to be uploaded as artifacts. As we want all the files in build directory to be uploaded, we're specifying the pattern '**/*'. This means all the files with the base-directory would be uploaded.
Pushing the code to CodeCommit repository:
I assume you've configured SSH. If not, you can follow the instructions mentioned in the repository.
You can execute below command to add remote origin.
git remote add origin ssh://git-codecommit.us-east-1.amazonaws.com/v1/repos/react-appThen, you can push your changes
git commit -m "react-with-pipeline"
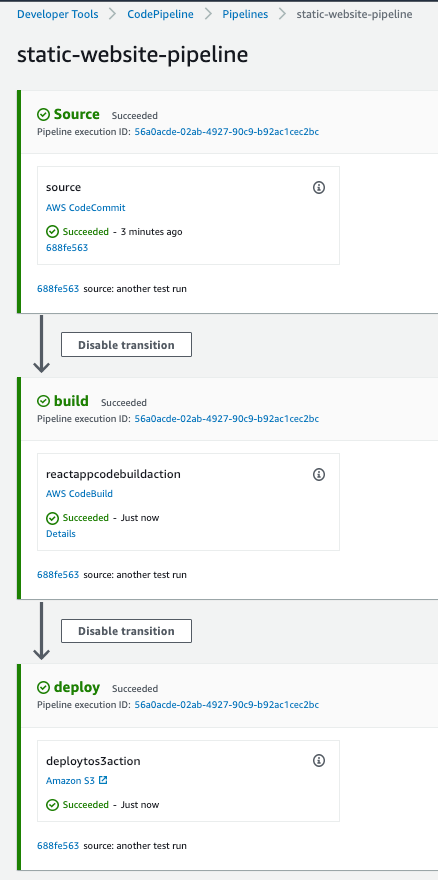
git push origin masterAs soon as you push your changes, you can see that AWS CodePipeline kicked-in and started executing your pipeline. After sometime, you can see all the stages got executed successfully - as shown below.
If you want to know what is happening in build stage - you can click "details" link in build stage and you'll be able to see below screen
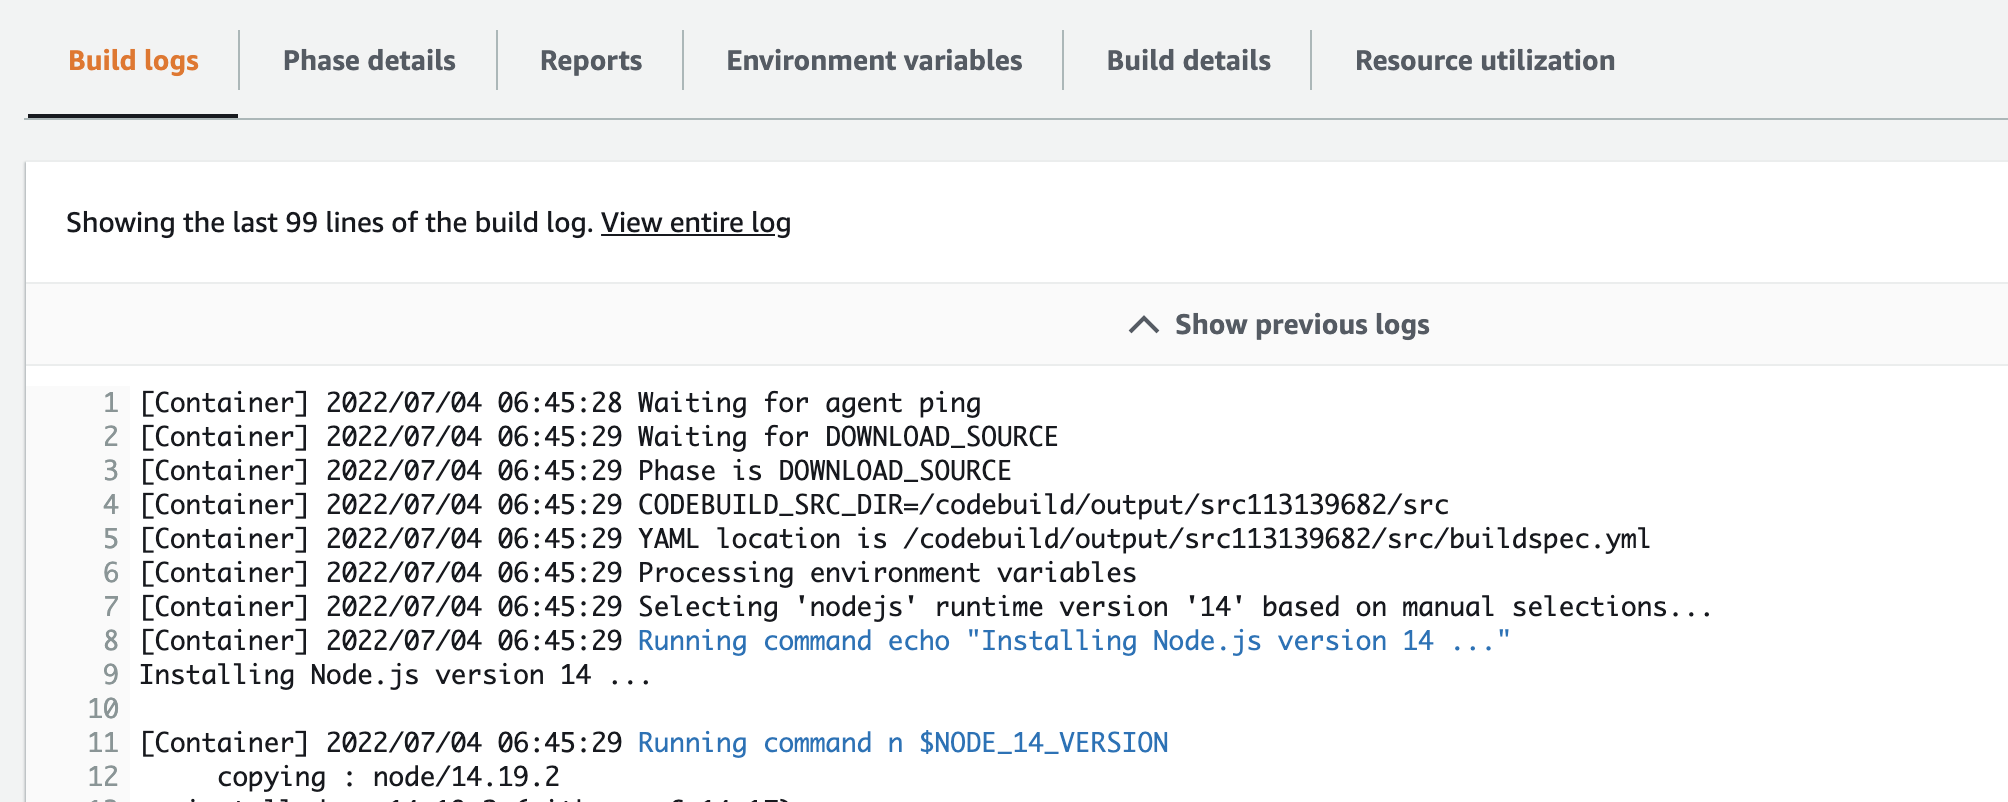
Click "Phase details" tab and you'll be able to see below screen
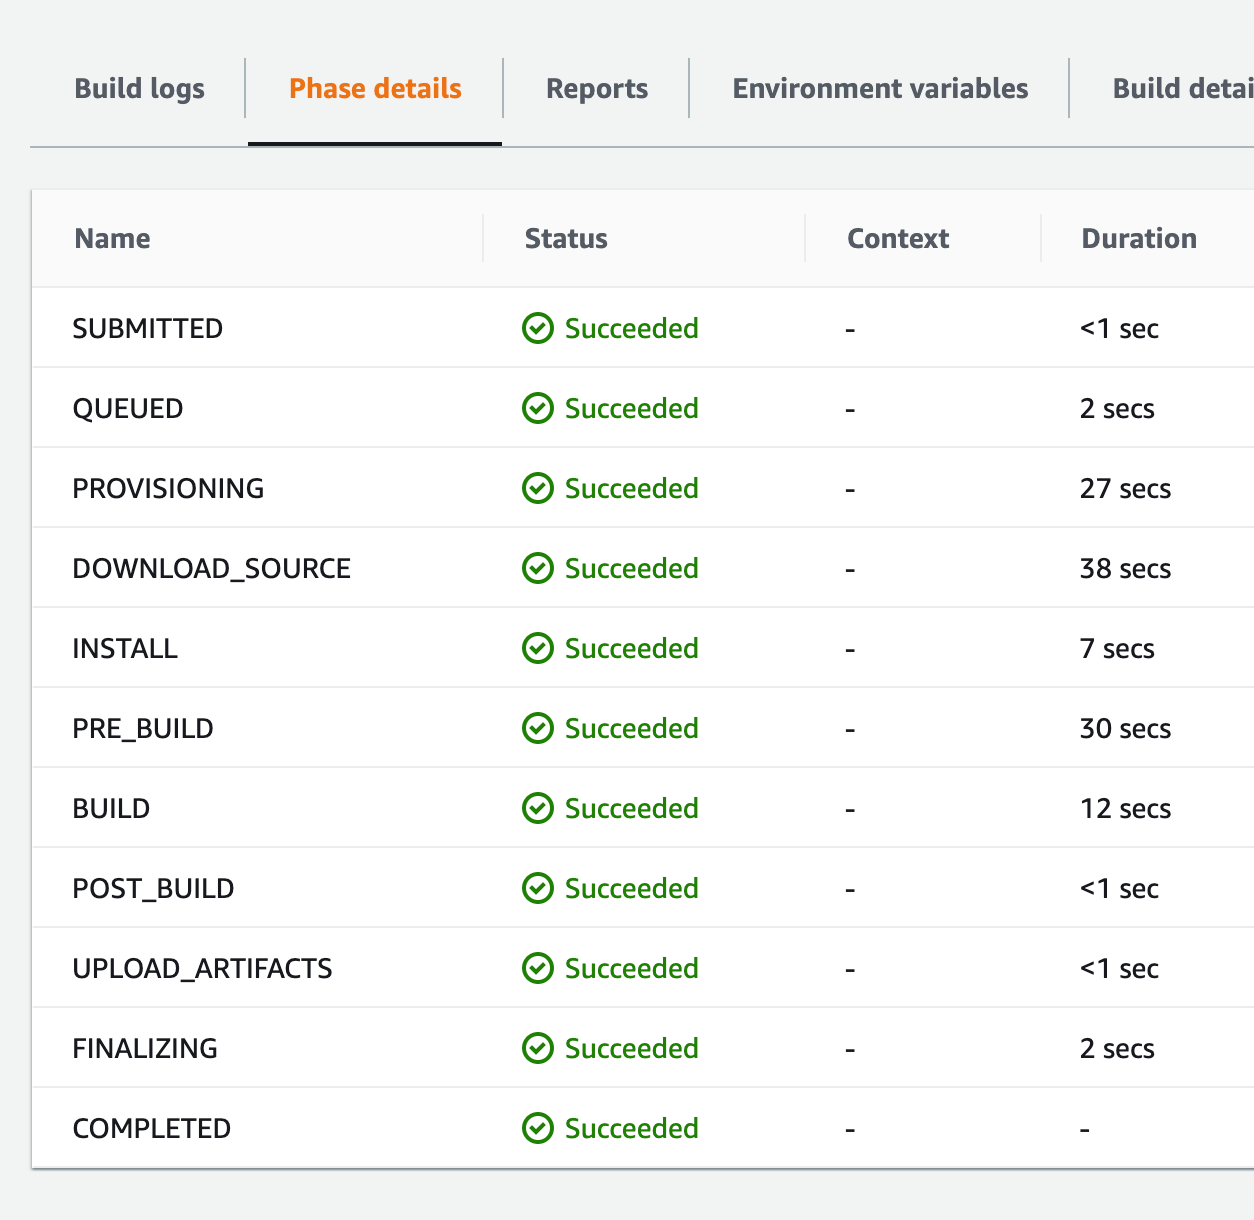
Most of the above phases are self-explanatory. I'd like to explain about PROVISIONING phase. In this phase, CodePipeline is trying to provision docker container to run the commands mentioned in buildspec.yaml file.
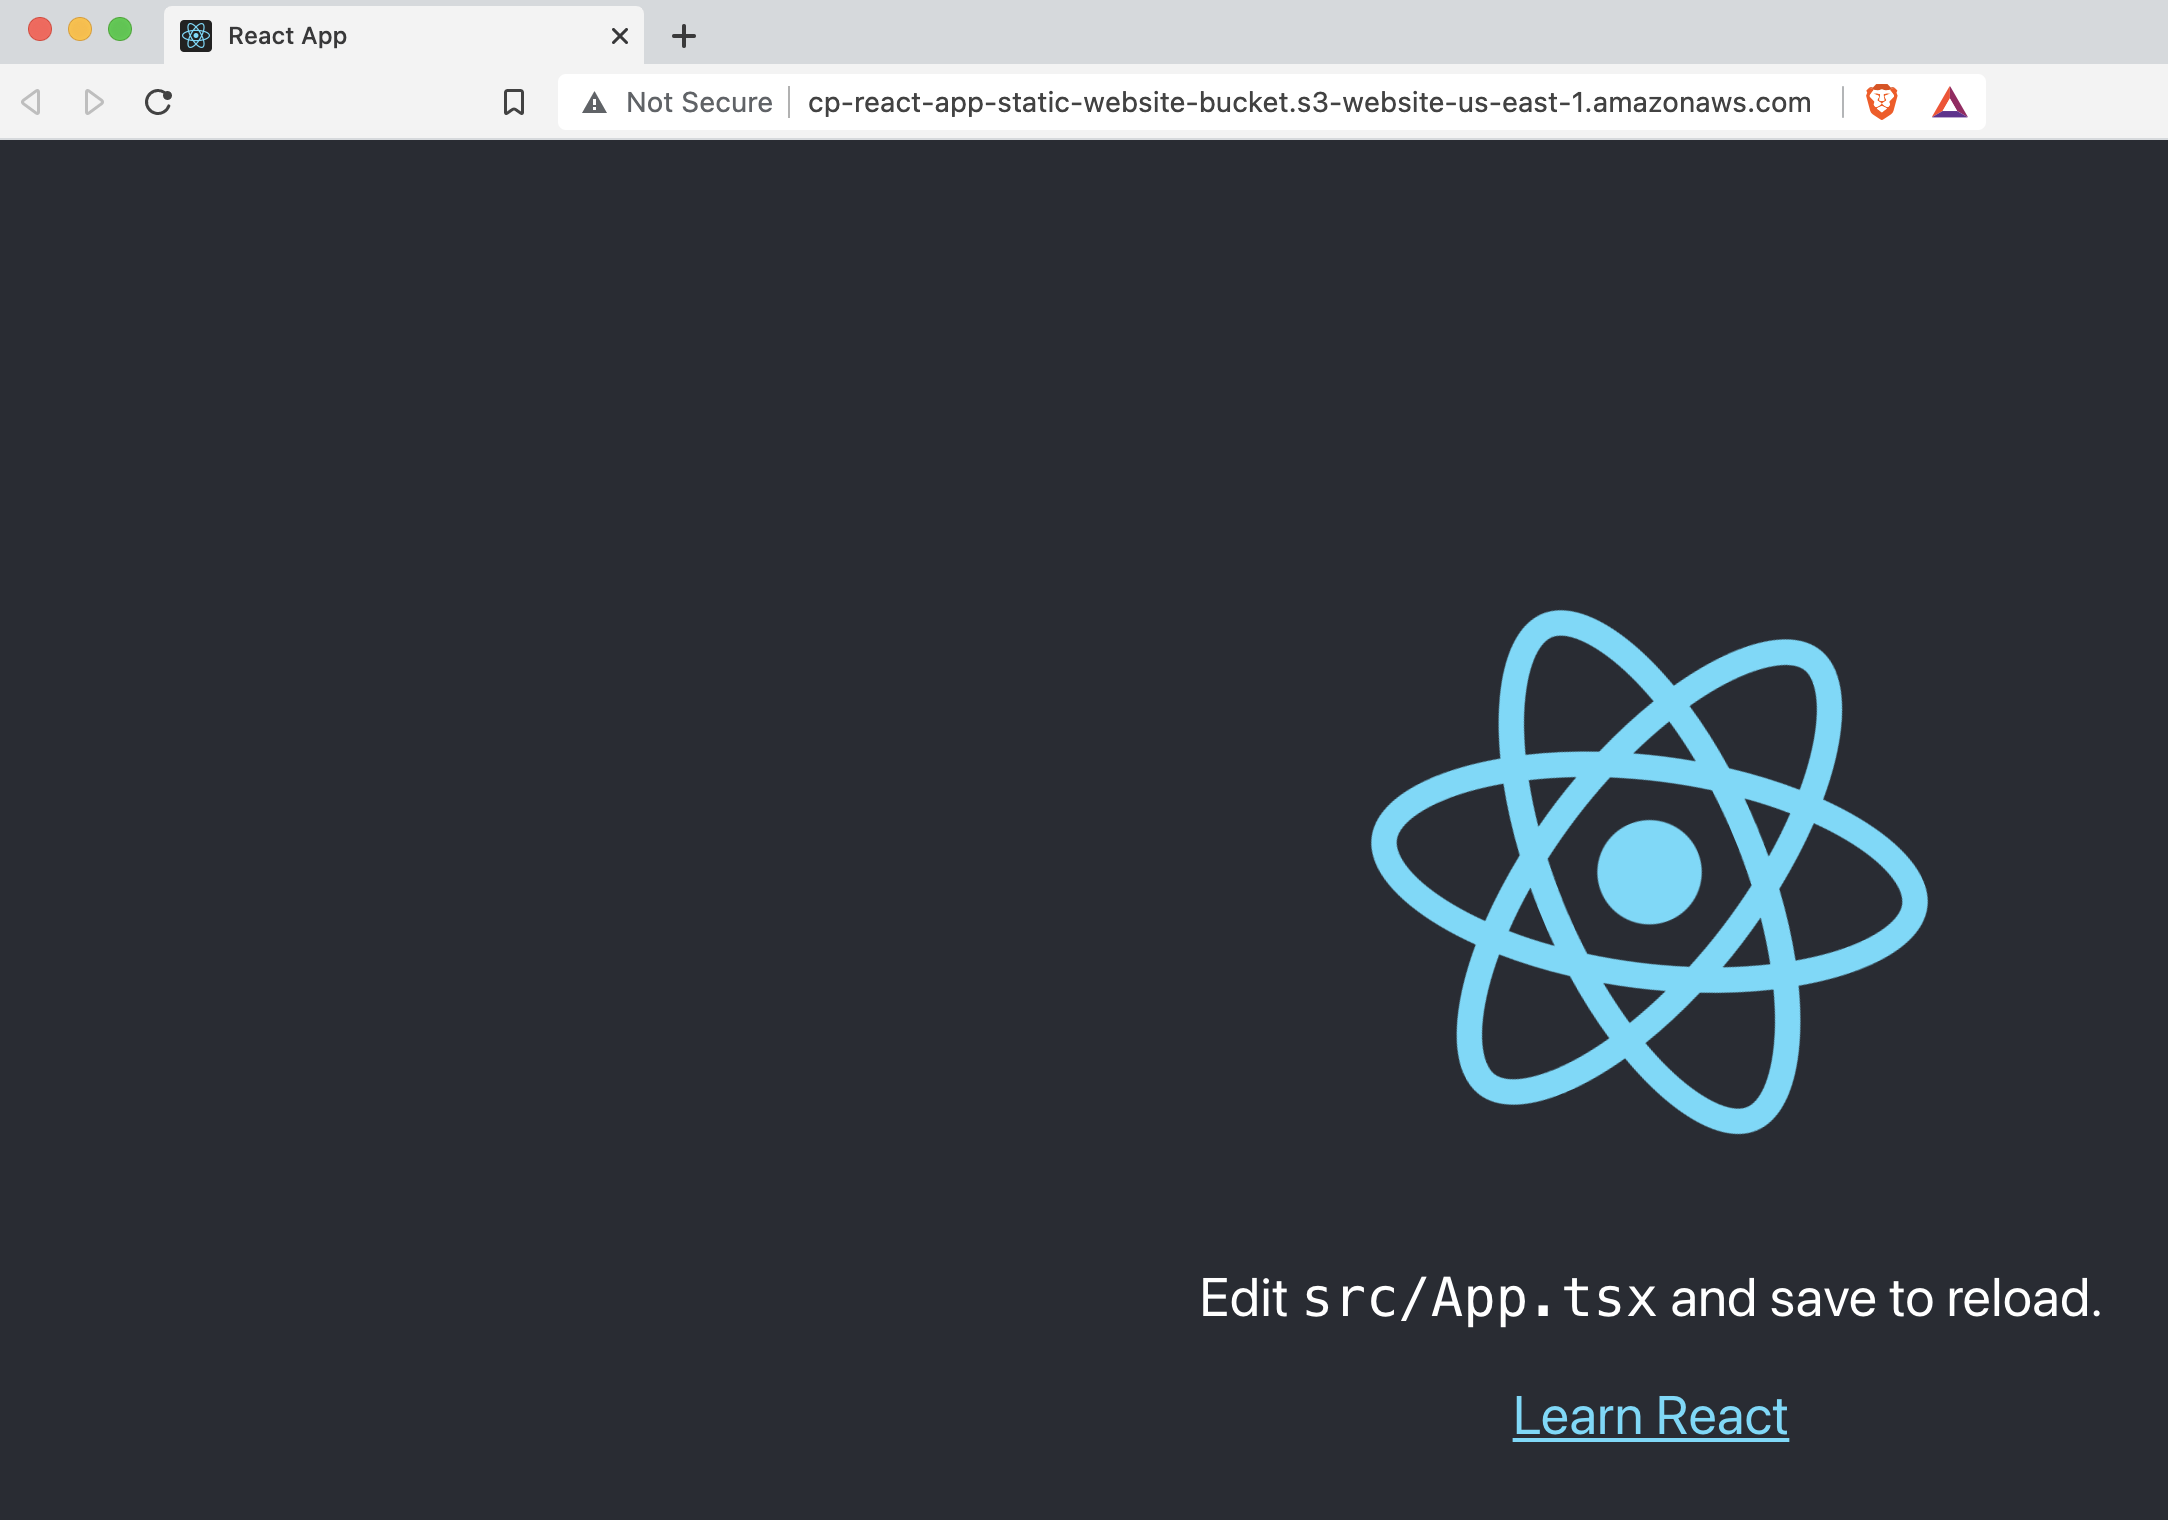
And, finally make sure that you're able to access the react application by accessing the website url (as mentioned in S3 bucket)
If you like this guide, please subscribe. Please let me know your thoughts in comments section.